Todaiji Temple, Nara
Todaiji Temple is a famed World Heritage Site with a host of National Treasures like the Great Buddha. In our ultimate two-hour tour, we unveil the best ways to experience everything it has to offer.
Main Hall and Mirror Pond
Kongo Rikishi

Wild Deer

Transcript
Todaiji Temple, in Nara Prefecture.
Nara was ancient Japan's capital.
For centuries, its Main Hall seen here, was one of the largest wooden buildings in the world.
Enshrined inside, The Great Buddha of Todaiji.
This immense Buddha image never fails to astonish.
It was crafted in the 8th century to help bestow peace and tranquility
amidst an age of disasters, famine, and rampant epidemics.
Today it is a UNESCO World Heritage Site and the home of over 30 National Treasures of Japan.
Our special route map will show us the best of Todaiji in two hours.
And if you're watching from home, this tour will be the next best thing to being here.
Interludes of animations and stories will make things easy to understand and remember.
The perfect two-hour guide to Todaiji Temple starts now.
Todaiji is 15 minutes by bus from Nara Station, followed by a short walk.
For most of the eighth century, the city of Nara was the emperor's capital even before Kyoto.
Let's look at our map.
Our two-hour guide covers three areas with 18 must-see sights.
In Area 1, we explore the main gate, then proceed to the Great Buddha.
We'll learn quite a lot about this famous image.
In Area 2, after we examine an ancient bell, we'll make our way to Nigatsu-do Hall,
a popular place to visit with great scenery.
In Area 3, we'll visit a temple and Shinto shrine dating back to Todaiji's origins,
which give insight into its founding spirit.
Our two-hour clock is officially running.
As you can see, a few of the locals are already waiting...
Deer.
These are sacred animals here.
We'll be seeing a lot of them.
Our first must-see is just one minute away.
Must-See No.1: Nandai-mon
This is Nandai-mon, which means the Great South Gate.
As you approach it, you realize how big it really is.
It's 25 meters high.
Looking up, you can see the double roof.
Of all temple gate types, double-roofed gates are the highest status.
Rebuilt in the 13th century, this gate is a national treasure of Japan.
And nestled within, is another national treasure.
Must-See No.2: Kongo Rikishi
These towering wooden figures are eight meters high.
They stand watch to protect the temple from evil.
Like the gate itself, they date to the early 13th century.
Their forceful expressions and poses are typical of the art of that period.
Even their veins are hyper-realistic.
After examining it close up, step back to the second pillar on the left to see the whole figure.
It was carefully proportioned to look best from this perspective.
Let's check out the other guardian.
This one seemingly displays even more attention to detail.
See if you can make out anything unusual about the figure's left breast.
There's evidence that the areola has been repositioned outward.
The right one as well.
This small post-hoc adjustment makes the chest appear broader when viewed from below.
How did the ancient artists do it?
The secret is how the statues were constructed.
This is how it looked disassembled for restoration.
The limbs and torso are divided into more than three thousand separate parts.
That's why the areolas could be repositioned to make the chest look broader.
It's said that the figures were completed in just 69 days
thanks to the division of labor amongst nearly 20 skilled artisans.
With such impressive detail, these guardians are sure to scare off any evil that tries to pass through the gate.
Elapsed time is now about 15 minutes.
Let's continue through the gate and straight on...
before we pause for more information about Todaiji.
This gigantic temple was built about 1,300 years ago when Nara was the capital.
The principal image enshrined here is known as the Great Buddha of Todaiji.
Emperor Shomu commissioned it as a beacon of peace to protect his people from conflict and calamity.
And despite the ensuing wars and natural disasters, through repair and reconstruction, the Great Buddha has endured.
Let's walk ahead, then to the right.
The next must-see has some very special scenery.
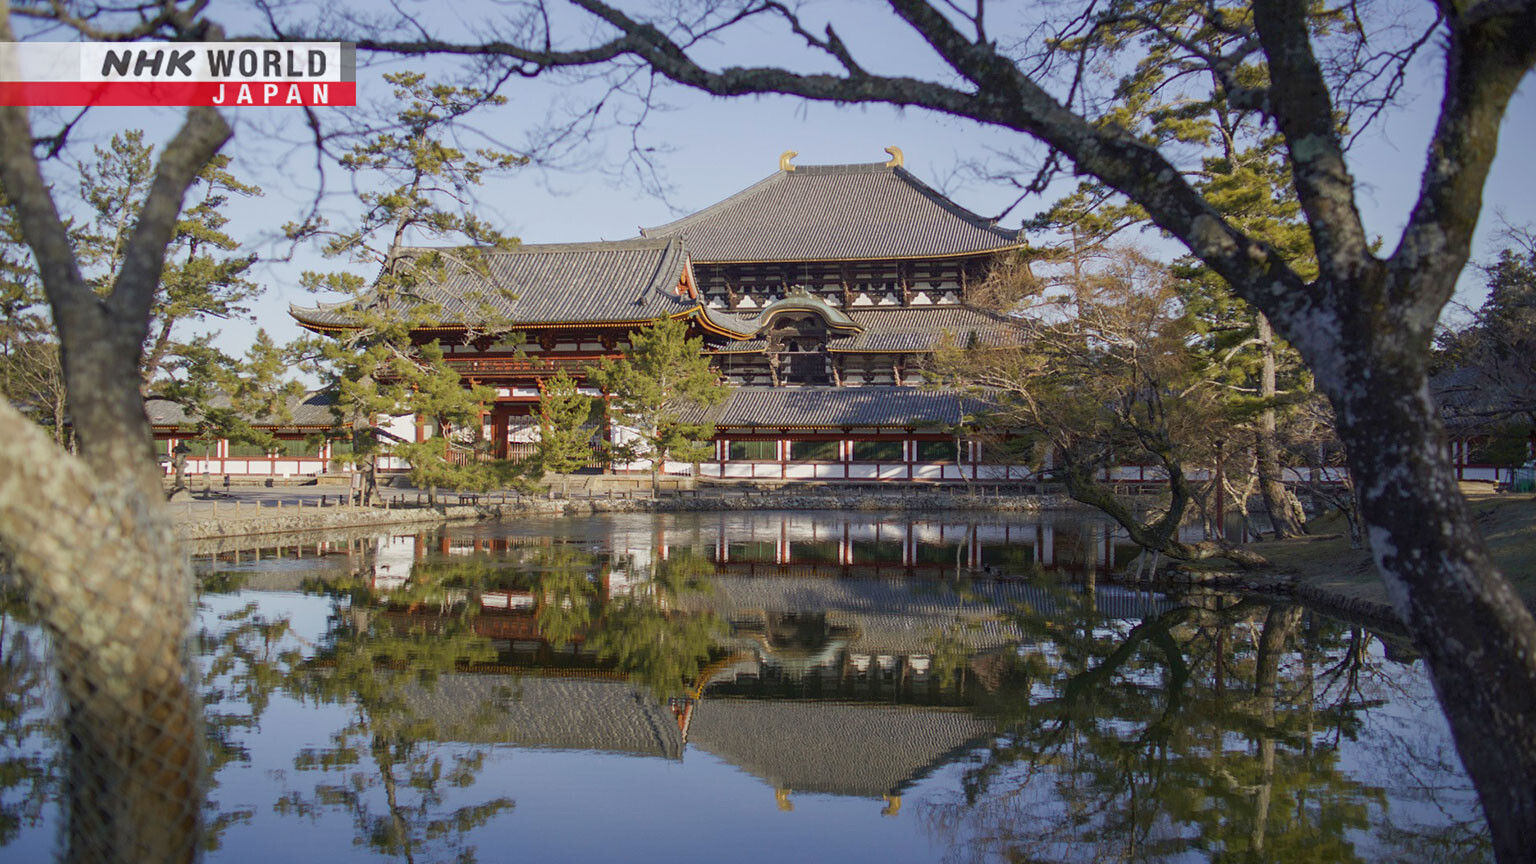
Must-See No.3: Mirror Pond
The surface of the pond reflects its surroundings like a mirror.
It's the perfect angle for photos.
Whether it's autumn's vibrant colors or a snowy winter landscape, each season offers a unique aspect.
The best time to shoot is in the morning when the whole scene is lit by the sun.
Now let's make our way to the Main Hall.
Returning to the path, we can see a gate up ahead.
This gate is open on New Year's Day from midnight until 8 AM.
So we veer left, to another entrance.
There's a fee for entry to the hall.
Just a little further on is the next must-see.
Must-See No.4: Great Buddha Hall
The Main Hall was built to house the Great Buddha.
Take a step back and see just how large this structure is.
With people for scale, you can grasp the sheer size of this building.
The roofline is 49 meters above the ground.
For centuries, this has been the site of one of the world's most massive wooden structures.
The roof decorations stand three meters high and are covered in gold leaf.
110,000 tiles cover the roof.
Replacing half of them during restoration took seven years.
Preserving Todaiji is a huge effort, but successive generations have risen to the challenge.
The Great Buddha is just steps away, but before that, there's one more must-see.
Must-See No.5: Octagonal Lantern
This octagonal lantern is as old as Todaiji.
It's not just the biggest metal lantern in Japan.
It's also the oldest.
The sides are decorated with beautiful bronze castings.
Every other panel depicts a bodhisattva.
Each one plays a flute or a percussion instrument.
They eternally make beautiful music for the Great Buddha.
Elapsed time is now about 30 minutes.
It's time to enter the Great Buddha Hall.
Must-See No.6: Vairocana Buddha
Seen from close up, the image is almost overwhelming.
This is Rushana-butsu, or Vairocana Buddha.
The height of this statue is nearly 15 meters.
Its face is five meters tall, and its nostrils are 37 centimeters across.
But the image is far more than its stats.
It's time to delve deeper into its secrets.
For more insights, we turned to someone who knows a lot about the Great Buddha.
Hello, my name is Matsude.
Matsude Yoko visits Todaiji ten times a year.
She's a Buddhist art enthusiast.
The Great Buddha has different faces from different angles.
Let me show you.
For example, let's stand here.
We're looking at the Buddha's right side, from between two columns.
This is a view you often see in guidebooks.
The face looks somewhat square.
The gaze and eyebrows project strength.
Buddha seems to be waiting to hear our prayers.
The face is awe-inspiring.
Shall we try again, from another angle?
That's why we're here!
Many visitors only view the Buddha from the front and side.
But there are other interesting angles. Each one has its own appeal.
The next viewing spot is one meter to the left of the fourth pillar in the Main Hall.
The face doesn't seem square from here.
The line of the nose curves gracefully. Buddha looks very striking.
It's almost a different image.
Let's walk further around to get another view.
How does Buddha look now?
From this angle, the face can hardly be seen.
The strong line of the nose is hidden behind the cheek.
Now the handsome face looks cute, with its plump cheeks.
Each viewpoint shows us something new.
Thanks very much, Matsude-san.
Vairocana Buddha is revered as the embodiment of the light of compassion and wisdom.
The mole-like dot on Buddha's forehead is a symbol of enlightenment, shedding light across the world.
Spiral locks of hair signify superhuman transcendent wisdom.
In 743, Emperor Shomu ordered the creation of a giant Buddha image.
It was a time of disasters and famine, of epidemics and rebellions that took the lives of thousands.
As a symbol of hope and healing, a magnificent Buddha was envisioned.
Let's look closely at the base of the image.
You can see that it's decorated with pictures.
This may be what the first Great Buddha looked like.
Between the founding of Todaiji and the construction of the Buddha we see today,
the temple had to endure numerous hardships and two civil wars.
Todaiji burned down during the 12th century.
It was soon rebuilt, but it burned again during the civil wars of the 16th century.
The Buddha's head and torso were destroyed.
Due to a lack of funding, a hastily repaired Great Buddha stood in the open for nearly a century.
Until a priest from Todaiji stepped forward.
He gathered donations to repair the temple
by sharing the profound story of the original Great Buddha's creation and deep significance.
Casting of the new image was finished in the late 17th century, giving the Great Buddha the face it has today.
Through war and disaster, the Buddha endures, thanks to people's support through the ages.
That's it for Area 1.
Here's something to consider if you have extra time.
Two Hours Plus!
You can sample traditional Nara sweets at shops you'll find on the temple grounds.
This is warabi mochi.
It has a soft, jelly like texture, and is topped with dark molasses.
It's good!
You'll find more shops just outside the temple.
Powdered starch from the root of the warabi plant is mixed with sugar and water,
and slowly kneaded into a paste over heat.
The paste solidifies as it cools.
At room temperature, it's exquisitely soft and light.
Warabi thrives in the mountains east of Todaiji.
For centuries the area has been a leading producer of warabi starch.
Warabi mochi is a regional delicacy.
If you have time, be sure to try it.
Let's start our tour of Area 2.
It includes several spots that will bring us 13 centuries back in time, to Todaiji's roots.
We'll visit the scene of a well-known legend, and see the great temple bell.
Then we stroll along a path with historic atmosphere to Nigatsu-do Hall,
which draws almost as many visitors as the Great Buddha itself.
The panoramic view from there is not to be missed.
We're leaving the Main Hall.
Elapsed time is now about 50 minutes.
Let's walk about a hundred meters down this path.
Where the wall on the left ends, we find our next must-see point, a stone stairway.
Must-See No.7: Cat Stairs
These are known as the Cat Stairs.
There's an interesting legend connected with them.
Long ago, a priest was climbing the stairs...
when he slipped and transformed into a cat.
According to Todaiji lore, if you lose your footing here, you'll be a cat in your next life.
The stairs are thought to have once been much steeper.
The legend serves as a warning to be careful as you climb, otherwise you might come back as a cat.
Sometimes it's better to play it safe.
We made it safely to the top.
The deer are up here too, taking it easy.
Just to our left is another must-see.
Must-See No.8: Karakuni Shinto Shrine
The origins of this Shinto shrine are lost to time,
but some think it was built to enshrine the spirits of people from the Korean peninsula who helped build Todaiji.
These immigrants are said to have brought the latest technologies to Japan from mainland Asia.
The Great Buddha owes its existence to people from near and far.
Elapsed time is now about one hour.
The next must-see point is right at the top of the stairs.
Must-See No.9: Bell Tower
This impressive temple bell tower is 13 meters tall and was built in the 13th century.
The great bell itself dates to the founding of Todaiji, and is a National Treasure.
The bell is made of bronze and almost four meters tall and weighs 26 tons.
This tour group wants to get a look inside.
Let's do that too.
Looking up gives a real feel for the size of this huge bell.
The opening is almost 3 meters across.
But how does it sound?
The great bell is rung each evening at eight o'clock.
The job of bell ringer is a hereditary position.
Let's listen.
The sound of the 8th century, undimmed by time.
As we step down from the bell tower, we head left.
It's this steep stone slope.
Watch your step going down.
We're heading for the temple grounds behind the Main Hall.
This area has fewer visitors.
It's quiet and peaceful.
If we turn right here and continue on, we'll arrive at our next must-see.
Must-See No.10: Urasando Walk
Urasando is a little path paved with stone and lined with earthen walls reinforced with roof tiles.
It leads to Nigatsu-do Hall.
This path is also a favorite of photographers of all stripes.
The best shooting location is here on the fourth step, about a meter to right of center.
That puts path and hall together in your viewfinder.
Cherry blossoms in spring.
Red leaves in autumn.
Snow in winter. It's up to you!
Photo buffs have been coming here for generations.
The earthen walls have a unique charm.
Old roof tiles project from the mud matrix.
The tiles direct water away from the wall and give it greater strength.
Simplicity and rustic elegance.
Maybe that's why photographers find this scene irresistible.
At the top of the stone pathway, you will find the entrance to Nigatsu-do Hall.
There it is.
The hall is a favorite of visitors to Todaiji.
Must-See No.11: Nigatsu-do Hall
This magnificent structure was rebuilt in the 17th century.
Its name means "second month hall."
More on that later.
But first...
When you reach the top of the stairs, turn around and enjoy the view.
You can see the Great Buddha Hall in the distance, rising above the trees.
This is another view you often see in guidebooks.
Let's walk out on the balcony for another great view.
You can see the temple buildings...
and the city of Nara in the distance.
It's not surprising that this is considered one of Todaiji's best panoramas.
We've enjoyed the view, now let's pay our respects to Kannon, the principal image of the Hall.
It's just a few steps down the balcony.
Put your money offering in this box.
Bring your palms together in prayer.
The Nigatsu-do Kannon is well hidden.
Not even the priests of Todaiji are allowed to see it.
Because of this, we can only speculate what it looks like.
We're going to retrace our steps now, because there's something you really have to see.
You'll understand why the Nigatsu-do is called "the second month hall."
Look at the railing.
Something has worn waves into the wood.
But why?
Let's dig deeper.
The Shuni-e ceremony is held at the Nigatsu-do during the second month of the lunar calendar.
A team of 11 priests perform acts of penitence for humanity's sins and errors, and offer prayers for their happiness.
The Shuni-e ceremony has been held every year without fail for more than 12 centuries.
The high point for visitors is the Fire Ceremony, with huge flaming torches waved from the hall balcony.
The torches are supported on the railing and raised high into the air.
They send cascades of cinders to the ground as they move back and forth.
Standing beneath the falling cinders is said to confer protection against illness and misfortune.
The grooves worn in the railing are testimony to centuries of worshippers' prayers for deliverance.
At our next stop, we'll get a closer look at one vital element of the Shuni-e ceremony.
Must-See No.12: Nigatsu-do Teahouse
The tea house is a place to rest and recharge.
It's also a trove of information about the Shuni-e ceremony.
On the wall to the left of the entrance is a torch like the ones the priests use.
You can see how large they are.
The torch is a meter across.
It's fashioned from cypress twigs and leaves.
The burning leaves fall as fine cinders that quickly go out.
The torch handle is a six-meter stalk of bamboo.
The bamboo used in the ceremony arrives from all over Japan.
The Shuni-e ceremony has a place in the hearts of even those who are far away.
It's been about one hour and 25 minutes.
We return to the Nigatsu-do Hall...
And descend the stairs on the other side.
The building on the right is our next must-see.
It also plays an essential role in the Shuni-e ceremony.
Must-See No.13: Sacred Well
Inside this small building is a well that supplies sacred water used in the ceremony.
During the Shuni-e, water is drawn from the well and offered to the principal Kannon image.
The well itself, as well as the drawing of water, are closed to the public.
Except when the ceremony is in progress, the well remains sealed.
There's an atmosphere of sacredness surrounding this spot.
Our tour of Area 2 is complete.
Before we proceed to Area 3, there's one more thing to see.
Nigatsu-do Hall is accessible 24 hours a day with no admission fee.
It's a beautiful place to be, late at night as well as during the day.
When the temple lamps are lit, the atmosphere is truly fantastic.
The lights of Nara glow faintly.
You've come a long way, so don't miss the Nigatsu-do by night.
Next up, Area 3.
Let's learn more about the origins of Todaiji and why it was built.
In Area 3, we'll tour five must-see points.
We'll see Todaiji's oldest hall and view masterpieces of Buddhist art.
Finally, we'll learn how the god of a Shinto shrine came to be a protector of Todaiji.
Elapsed time is now about an hour and 30 minutes.
The next must-see is close to the Nigatsu-do.
It's easy to overlook, but you haven't seen Todaiji until you see this too.
Must-See No.14: Hokke-do Hall
The Hokke-do is the oldest of Todaiji's halls.
It's named for the Lotus Sutra, an important scripture of Mahayana Buddhism.
In fact, this hall is the seed that grew into Todaiji.
In 727, Emperor Shomu welcomed his firstborn son.
The prince's name was Motoi.
But soon after his birth, the prince fell ill.
The emperor ordered Buddha images to be made to protect his son from illness.
But Prince Motoi never reached his first birthday.
The grieving emperor built a hall dedicated to Kannon worship.
Today's Hokke-do is believed to be that same hall.
For centuries, the Hokke-do has been a testament to parents' love for their children.
Let's go inside.
First we purchase a ticket.
All of these majestic images are national treasures.
A bench invites us to sit quietly and contemplate existence, or just take in the view.
Must-See No.15: Fukukensaku Kannon
This is the principal image of Hokke-do Hall.
It is believed to be one of the images created to help Prince Motoi recover.
One of its eight arms is especially interesting.
Can you see the rope snare that Kannon is holding?
It represents Kannon's power to capture sentient beings and save them.
Kannon's crown is connected to Emperor Shomu.
These multicolored beads are thought to have belonged to the emperor himself.
Kannon is surrounded by many other images.
They are another reason this hall is so important.
Must-See No.16: Eight Guardians of Kannon
Eight images surround the Kannon.
All are national treasures.
They are positioned to protect the principal image.
Heavenly kings stand guard over the four directions.
This one protects the south.
They hold a spear and trample demons underfoot.
To the rear, stands the protector of the west.
To the right of Kannon are the guardians of the east and north.
One more guardian commands the Heavenly Kings.
And with another god, they stand on either side of Kannon.
And just in front of Kannon are the Deva Kings, or Kongo Rikishi.
We encountered them before, at the Great South Gate.
Finally, let's find a spot where we can see all of these images together.
Approach the foot of the staircase and turn around.
From here, we can see Kannon's full retinue of guardians.
They seem radiant with the power of Emperor Shomu's longing for his lost son.
Hokke-do Hall was well worth seeing, don't you think?
Elapsed time is now about one hour and 50 minutes.
Our two-hour tour is almost complete.
A minute's walk from the Hokke-do, we reach our next destination.
Must-See No.17: Tamukeyama Hachimangu Shrine
We've arrived at Tamukeyama Hachimangu Shrine.
This Shinto shrine, which takes its name from Mount Tamukeyama, is dedicated to the god Hachiman.
Emperor Shomu invited this Shinto god to watch over Todaiji Temple.
Since then, the emperor's welcome of the god has regularly been re-enacted.
This festival was once one of the biggest events in Nara.
A scroll preserved by the shrine shows a procession of 250 horses and portable shrines.
Ceremonies are still held, with priests from Todaiji and the shrine joining to preserve the tradition.
Emperor Shomu wanted peace for his people and his kingdom.
Wide support was needed to erect the Great Buddha.
So he welcomed Hachiman's cooperation.
Today, Shinto god still protects the Buddhist temple of Todaiji.
The emperor's fervent desire to protect Todaiji by any and all means echoes down the centuries.
If we walk down these stone steps, we'll arrive at our final must-see point.
Must-See No.18: Michizane's Stone Seat
A famous poem is carved into this stone.
The poet has come without a proper way to worship the gods.
But he hopes they will accept red autumn leaves instead.
The poet was Sugawara no Michizane, a ninth century politician.
He was a renowned scholar.
After his death, he was revered as the Shinto god of learning.
Legend has it that he paused to rest, not on this rock, but on the smaller rock to the right.
You can sit here too.
Perhaps a little of the poet's brilliance will rub off on you.
With one visit centuries ago, he enriched this historic shrine,
which has served as a guardian throughout Todaiji Temple's storied past.
Elapsed time is two hours.
We made it!
Let's look back and see where we've been.
In Area 1, we saw the impressive Great South Gate and its Kongo Rikishi, then took some photos at the mirror pond.
We then explored the Main Hall and the many faces of the Great Buddha.
In Area 2, we climbed stairs attached to an ancient legend, and saw Todaiji's great bell.
We strolled up a historic stone walk to the Nigatsu-do Hall and learned about the spectacular Shuni-e ceremony.
In Area 3, we took in the many splendid Buddhist images in Hokke-do Hall.
We also visited the shrine where the Shinto guardian of Todaiji is venerated.
Todaiji Temple.
A symbol of hope that the world can yet become a place where people live with peace of mind.
A hope sustained by advanced craftsmanship and shared dedication across generations of countless individuals.
That's all for now.
We'll be waiting for you on the next two-hour perfect tour.
"Sayonara!"