Authentic Japanese Cooking: Chef Saito's Korokke
Chef Saito continues to teach us about Japan's beloved homemade classics. This time, he prepares a teishoku set meal, pairing the Japanese favorite korokke with rice, miso soup and pickles.
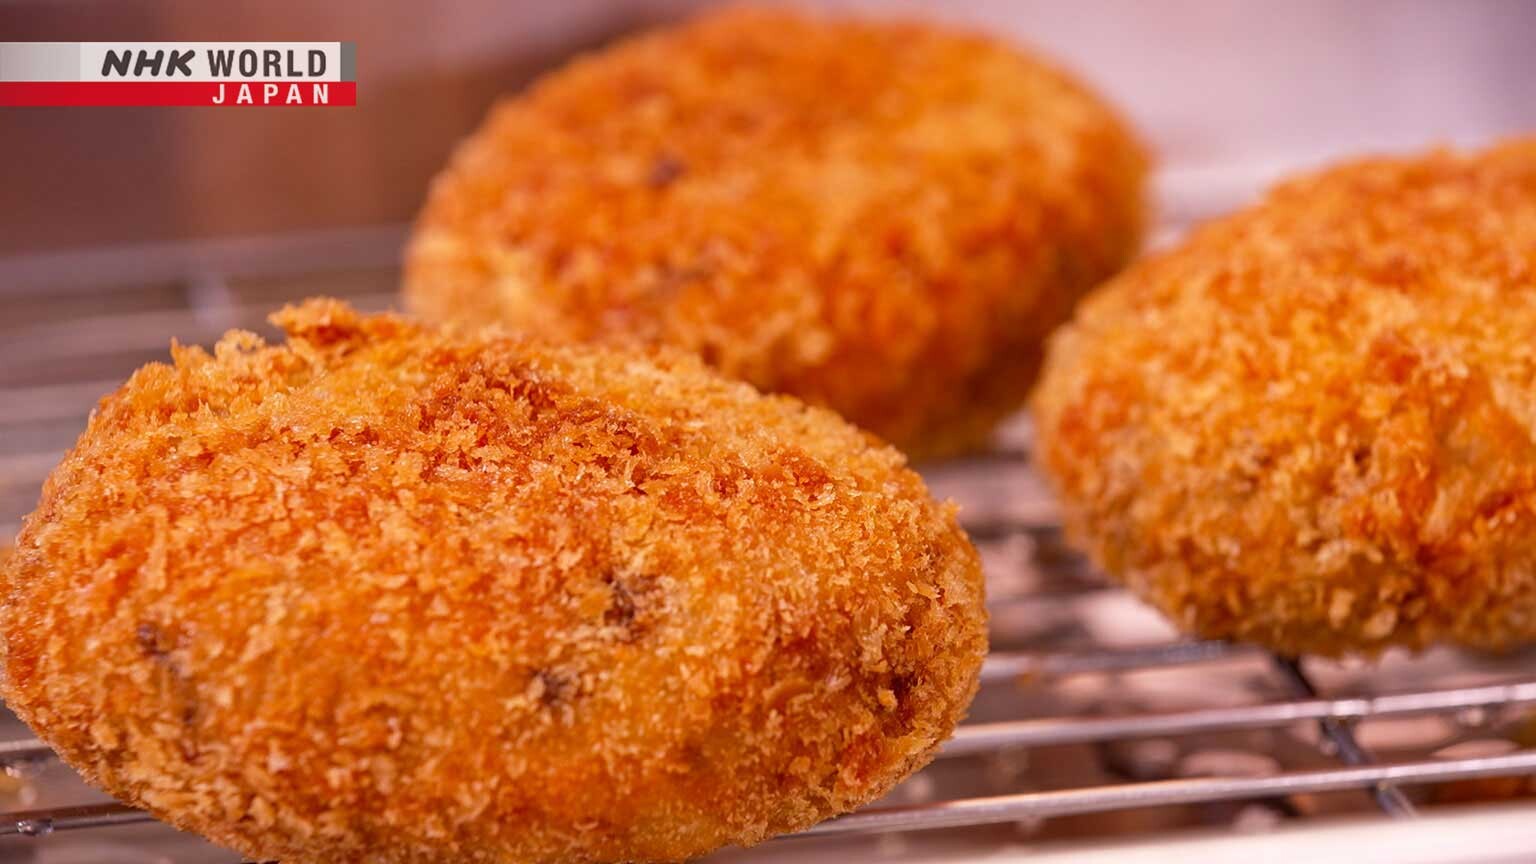
(1) Chef Saito's Korokke
Ingredients (Serves 2)
450 g potato
70 g onion
150 g ground beef
Salt, pepper, soy sauce, sugar, flour, beaten egg, panko, vegetable oil, parsley, as needed
For the garnish:
180 g cabbage
50 g carrot
6 cherry tomatoes
Directions
1. Peel the potatoes and cut into 4 pieces. Soak in water. Put the drained potatoes in a pot, cover with water and boil for about 10 minutes. Drain and return to the pot. Season with salt and pepper. Place over medium heat to dry the surface of the potatoes. Turn off the heat and mash while hot.
2. Mince the onion. Add vegetable oil to a pan and place over medium heat. Sauté the onions until they become glossy. Add meat and season with salt and pepper and sauté. Reduce the heat, add sugar and soy sauce and sauté while tossing together. Empty onto a cooking tray, spread out to set aside to cool.
3. Once cooled to room temperature, combine the potatoes with the beef and onions. Add flour and mix with a spatula to press down the mixture. Shape into 8 oval patties. Dredge in flour, beaten egg and panko. Deep-fry in 170 degrees Celsius oil.
4. Arrange the korokke on shredded cabbage and carrot, garnish with tomatoes and parsley.
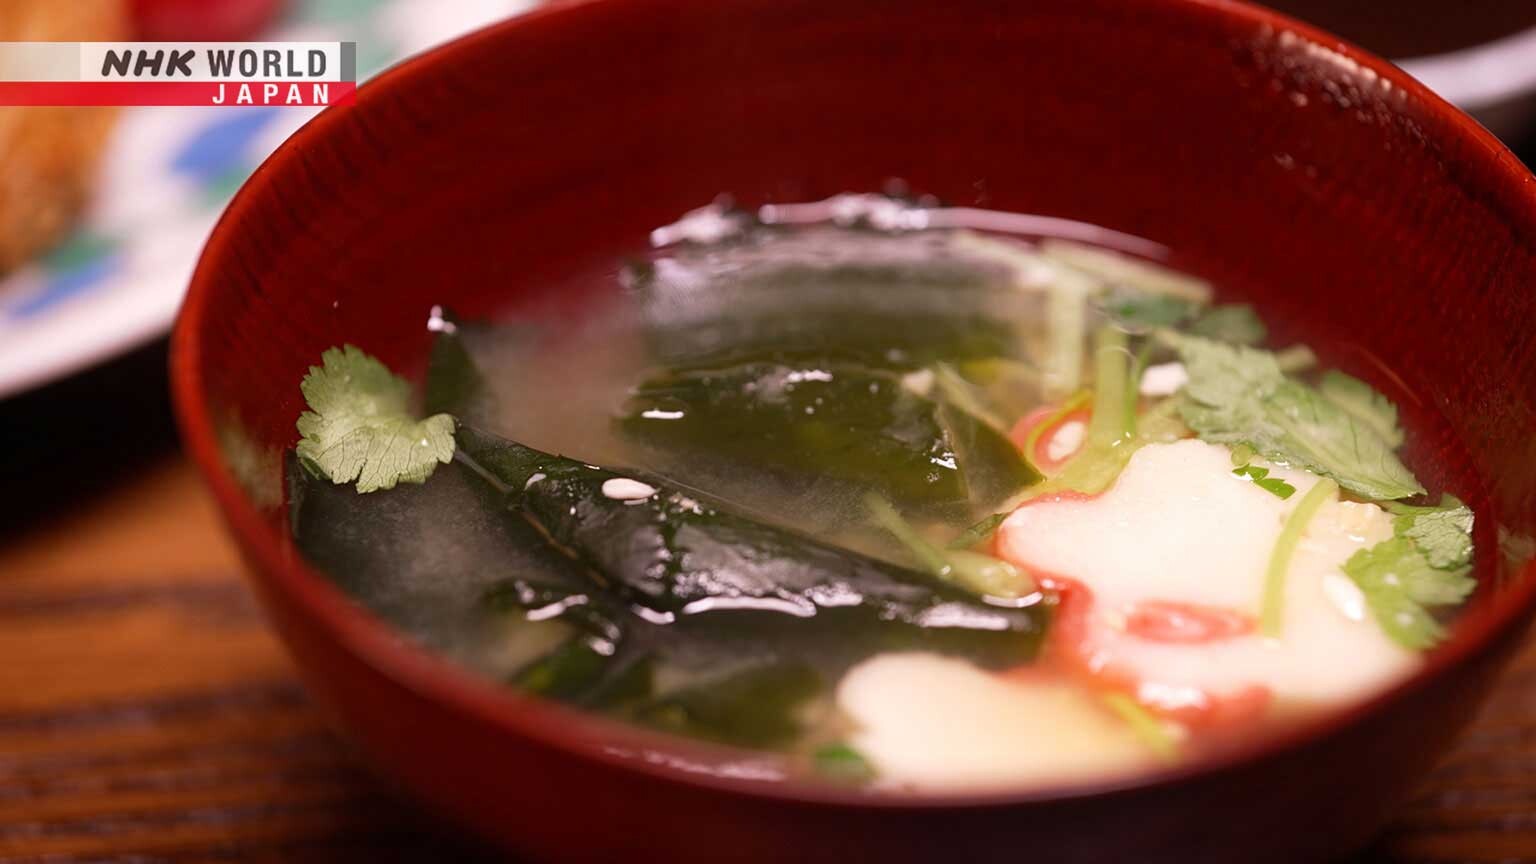
(2) Miso Soup with Wakame and Fu
Ingredients (Serves 2)
4 g dried wakame seaweed
10 pieces fu
20 g mitsuba
600 ml dashi (broth from kombu kelp and katsuobushi)
60 g inaka miso
Directions
1. Pour water into a pot, add the kombu and place over medium-high heat for about 10 minutes. Boil for about 30 seconds before removing the kombu. Add water to stop the boiling.
2. Add the katsuobushi and return to a boil for about 20 seconds. Turn off the heat and strain through a paper towel.
3. Place miso in a ladle, dip into the dashi and loosen with chopsticks. Place over medium heat. Add the dried wakame and fu.
4. Ladle the soup into bowls and add mitsuba, cut into 3 to 4cm lengths.
Transcript
Dining with the Chef!
Hello and welcome to Dining with the Chef.
I'm your host, Yu Hayami and here is our wonderful chef Saito!
Hello Yu, hello everyone.
So chef, what are you going to teach us today?
So today, everyone loves "korokke."
"Korokke."
Oh I love Japanese style croquettes. They are made by adding ground meat to mashed potatoes
and then you coat them with wonderful "panko" breadcrumbs and you deep fry them.
Oh they are everyone's favorite.
Yeah that's it. We make "korokke teishoku."
"Teishoku" is a standard type of meal set in Japanese cuisine.
It generally includes rice, a main dish, miso soup and pickled vegetables.
"Teishoku" is usually served at casual restaurants.
Yes, also white rice.
Okay. Well, I can't wait! Shall we?
Yes. Let's get started.
Japan is known for its bountiful fresh and delicious ingredients.
Amazing!
Japanese cuisine, guided by traditional culture that you will be able to prepare at home.
Perfect.
Today, a "teishoku," or set meal, featuring Chef Saito's original "korokke" as the main dish, with rice, miso soup, and pickles.
Let's join Yu Hayami and become Chef Saito's chef apprentices.
Here's our Master Chef, Mr. Tatsuo Saito!
Making us laugh and hungry at the same time.
Authentic Japanese Cooking.
Here's what's cooking today.
Chef Saito's "korokke," are made with simple ingredients and seasonings.
But he makes them so that they're crisp on the outside but fluffy inside.
He is going to show us how.
Here are ingredients.
Right. So we have mainly the potato, some ground meat, and onion.
So when we are preparing, shall we start with the potatoes?
- So yes, potatoes first.
- Okay.
- Peel.
- Peel.
- Then cut.
- I got it.
Indeed, peel the potatoes and cut into 4 pieces.
Soak them in water to remove the surface starch.
Put them in a pot, cover with water and boil for about 10 minutes.
Test the potatoes with a bamboo skewer.
If it goes through easily, they're done.
Drain thoroughly and return to the pot.
- Just a little bit salt. And pepper.
- Okay.
Season with salt and pepper.
Place over medium heat to dry the surface of the potatoes.
Keep stirring, as they can burn easily.
- They'll look like they're covered in powder.
- Yes.
The excess moisture evaporates.
- So the flavor of the onions and beef is easily absorbed.
- I see.
This is key.
Okay, this is important step.
This is very important step.
Okay.
That's good now, and mash.
Use a masher to mash while hot.
How much do we wanna mash this?
- It's nice to have a few lumps.
- Ah okay.
It's done. Okay, now let cool.
Okay, they look so yummy.
Set aside to cool.
Next, mince the onion.
Cut the onion in half.
Place the flat side down and make thin vertical slices.
Then make cuts at an angle to the cutting board.
Finally chop to mince.
So now fry onion and meat.
Okay, let's do it.
Add a dash of vegetable oil to the pan and place over medium heat.
First sauté the onions.
Sauté until translucent to draw out the sweetness.
Ah it smells so good.
Good.
- Oh excellent.
- Excellent.
When it becomes glossy.
- Glossy.
- Yes.
And then meat.
- Then we add the meat.
- Add the meat.
Season immediately with salt and pepper.
Sauté and mix well.
Oh this looks so good already.
Already?
Make sure to cook through.
- That way, the "korokke" can be fried quickly.
- Right.
Here is a tip from our Chef!
Once the meat is cooked through, Chef Saito gives it a Japanese twist with an original blend of seasonings.
Sugar and soy sauce.
Soy sauce.
Soy sauce and sugar burns easily, so reduce the heat and toss together.
That's gonna be so good.
- Sweet and savory, like sukiyaki.
- Ah kind of like a sukiyaki sauce.
Once the ingredients are seasoned and cooked through, turn off the heat.
Empty onto a cooking tray, spread out and set aside to cool.
It's easier to shape when cooled to room temperature.
And it won't fall apart when fried.
If it's hot, it retains excess moisture, causing it to crumble while frying.
Let the ingredients cool and you'll be rewarded with fluffy "korokke."
So it's important to cool it down first so that it will keep the shape better.
After half an hour, it's cooled to room temperature.
Now, let's combine the potatoes with the beef and onions.
This is flour.
The flour binds everything together, making it easier to form the "korokke."
Press down as you mix.
The flavors will come together.
Mix until the beef, onions, and potatoes are evenly combined.
Flatten and divide into eight equal portions.
Flatten and divide into eight equal sections.
How's it going, Yu?
Allow me.
Yeah, I can do it, chef. I can do it.
Understood!
Please watch me.
Yes.
Press and pull. That's it!
Pull towards you,
Turn over and do it again. This will keep the "korokke" from falling apart.
You really need to press down and smooth the surface to bind the potatoes with the meat.
- It starts to feel sticky.
- Yes.
Then, divide into 8 portions.
Okay, let's shape.
Today, standard shape is oval.
Oval shape, okay.
Slap the "korokke" back and forth to remove any air pockets. And tidy up the sides.
- This is oval, very traditional.
- That's perfect.
Okay, I'm gonna try that.
Any kind of shape is okay.
So once you have your basic "korokke" made, you can actually experiment.
And try different types of "korokke."
Nicely shaped oval patties.
Now for the breading.
We'll apply the breading in this order: flour, beaten egg, and "panko."
First, dredge in flour.
Here is a tip from our Chef!
Make sure to coat thoroughly with flour.
The flour plays a key role as a binder. Without it, the breading will fall off.
The color will be uneven, too.
So dredge thoroughly in flour.
Then the "korokke" will look good.
- Okay?
- Okay.
And next, egg.
Use a spoon to coat thoroughly with egg.
Check to see that it's totally covered before breading with "panko."
Cover the "korokke" with "panko."
Apply firmly around the sides, but keep the top part, light and airy.
Make sure they're thoroughly coated.
Apply more "panko" to the sides and tidy up the shape.
I see.
So you know, these days Japanese "panko" breadcrumbs are very popular around the world.
Yeah, very popular.
The large and airy flakes of "panko" produce a crispy breading.
That's why they've become so popular.
And I cover it, dredge it with "panko," pick it up.
- Check your "korokke."
- Yes.
Tidy up the shape.
Then I will add little more "panko,"
and I reshape it to ovals.
- Looks good.
- It looks good.
Perfect!
- Now let's deep fry.
- Yes.
Pour vegetable oil into a deep pot to a depth of around 5 cm.
Place over medium heat and fry at 170 degrees Celsius.
- I check the oil temperature.
- Okay.
Drop a few breadcrumbs into the oil to check the tempurature.
- If the "panko" floats right up, the oil is 170℃.
- Okay.
For a 22-centimeter pot, fry 3 at a time.
Overcrowding will cause the temperature to drop.
They're already cooked through, so just fry for 2-3 minutes, until golden brown.
Use chopsticks to move the "korokke" around to prevent them from sticking together.
- They're started to brown.
- Oh already.
- Okay.
- Okay.
Once they've started to brown, flip them over and fry for two more minutes.
The ingredients are already cooked through, so they're done once the breading is a golden brown.
Scoop out any crumbs, as they burn easily leaving the oil as clean as you can.
Oh, it's starting to look golden. Very nice.
Okay, almost done.
Oh, that looks so delicious.
Potato "korokke."
- Oh, that's perfect.
- Thank you.
Wow.
Yum!
Now, it's your turn, Yu.
Carefully lower the "korokke" into the oil using a fine mesh skimmer.
Use chopsticks to move them around to keep them from sticking to the bottom.
Oh.
That's okay.
- Turn over.
- Okay.
Once they start to brown, flip over and fry for two more minutes.
That's interesting, it gets dark from the middle.
That's why you need to move them around.
Moving them around allows them to cook evenly so the color is uniform.
Oh, it's so crispy, I can feel it. It's nice.
Outside crispy, inside very fluffy.
Fluffy and soft. Is that okay?
Yeah, it's okay.
That's nice color.
Oh, that looks good.
Well done, Yu.
Next, prepare the garnish.
Shredded cabbage is a popular accompaniment.
Roll up 2 or 3 cabbage leaves and cut into shreds.
Then, we cut a carrot into shreds.
Then, we mix it in.
Also, we'll add cherry tomatoes and parsley.
Oh this is wonderful, a little salad to go with the "korokke."
And adding a little bit of carrot gives it a color.
Yes, nice accent.
Nice accent, yes.
Plate a large serving of shredded cabbage and carrot and stagger stack the "korokke."
- And tomato.
- Tomato.
And parsley. Nice accent.
It does. I love parsley.
Aim for a mountain-like arrangement.
It becomes balanced.
Mmm, looks amazing.
Oh it's so nice.
- Yes it looks good.
- Okay.
And finished!
A light and refreshing miso soup goes very well with fried food.
Today's soup contains "wakame" and "fu," with a fragrant accent of "mitsuba," a Japanese herb.
Here are the basic "teishoku" components. There's a main dish, like "korokke."
Then white rice, miso soup and pickles. These three dishes are a must.
They're like bread, cheese and wine in French cuisine.
Today's main dish was "korokke," so I decided to pair it with a light miso soup.
So I see "wakame," seaweed, and, "ofu" which is like a wheat gluten and the Japanese very refreshing herb "mitsuba."
Dried "fu" is light and goes very well with miso soup.
"Fu" is made by kneading water and flour to form gluten.
After setting it aside to rest, the starch is rinsed off to extract the gluten, which is mixed with flour and baked.
So, where shall we start?
Make the "dashi," very important.
Make the base stock or "dashi" with "kombu" and "katsuobushi."
Gently wipe the surface of the "kombu" to remove any dirt or dust, but do not wipe off the white powder, as this has umami flavor.
Pour water into a pot, add the "kombu" and place over medium-high heat for about 10 minutes to extract the umami.
Boil for about 30 seconds before removing the "kombu."
Add water to stop the boiling.
Add the "katsuobushi" and return to a boil.
Remove any surface residue while boiling for about 20 seconds.
Turn off the heat and allow the "katsuobushi" to sink.
Then, strain through a paper towel.
Now you have a clear and flavorful golden "dashi."
Today, we're using "inaka" miso.
So "inaka" miso is roughly translated to countryside miso.
It's made with steamed soybeans and fermented with lots of rice "koji."
Yes.
Place an appropriate amount of miso in a ladle,
dip it into the "dashi," and loosen the miso with chopsticks.
- Little by little.
- Oh yeah, I like that.
Place over medium heat, but be careful not to let it boil.
You don't want to ruin the aroma and flavor.
Too much boil, smells gone.
The miso aroma disappears.
Add the dried "wakame" and "fu."
Wow, that looks good.
It's so pretty.
Both will reconstitute right away when added to the soup.
- Okay, arrange to serve.
- Yes.
Ladle the soup into bowls and add "mitsuba," that's been cut into 3-to-4-centimeter lengths.
"Teishoku" miso soup is done.
Wow.
Finished.
Chef, this is the perfect "teishoku."
Now all we have to do is put everything on one tray.
- One tray.
- Yes.
Indeed, now let's assemble our "teishoku."
- Freshly cooked rice is the star of "teishoku." But start with a small serving.
- Oh, not too much.
Because you can ask for seconds.
- The good thing about "teishoku" is that you can ask for more rice and miso soup.
- I see.
Okay, so main dish, then "korokke," and left side, rice.
Right.
And right side, miso soup.
Left side rice, and right side miso soup.
Also, sauce.
- Japanese Worcester sauce and "Chuno" sauce.
- Okay.
And pickles.
Today's pickles are "takuan" - daikon radish. Also, cucumbers, and eggplant.
Cut into bite-size pieces.
This is "korokke teishoku."
Yay.
"Korokke teishoku" is finished.
The "teishoku" is ready to serve.
Let's eat while the "korokke" are piping hot.
- Today's main dish is set in a "teishoku" style.
- Yes.
I love it. I mean, I just love how we have everything completed on a tray,
and the "korokke" looks delicious, chef.
- Thank you so much.
- Yeah, it's nicely brown.
It's really nice.
The main dish, like today's "korokke," needs to go well with rice.
You take alternative bites of the dishes to enjoy different flavors.
Okay, I think I will start with the miso soup.
Oh, good choice.
First, miso soup.
It moistens the throat and warms you up, stimulating the appetite.
Oh, this is wonderful.
And the aroma of the "mitsuba." That is very refreshing.
And I love the "wakame" - the seaweed - very soft and it's soaked up all the "dashi" broth.
It's very nice.
Now I think I will enjoy the main dish.
- Should I just try the "korokke" as is?
- Mm-hmm.
Oh, so crunchy.
Oh, it's crunchy on the outside, but very soft in the inside.
And you can pick up your rice bowl like this.
Mm.
Wow. This is so sweet.
Basically, it's mashed potatoes with savory ground meat, which is dredged in wonderful Japanese "panko."
So there's two types of sauce.
Yeah. Two types of sauce. Worcester sauce and "Chuno" sauce.
Japanese Worcester sauce and "Chuno" sauce are both popular sauces for Japanese fried dishes like "korokke" and "tonkatsu."
Both are made with a variety of fruits and vegetables, but "Chuno" sauce is thicker and a little sweeter.
- I recommend, my preferred.
- Yes.
"Korokke" and "Chuno" sauce, and also vegetable and Worcester sauce.
Okay, now I'm going to try it with the "Chuno" sauce as sensei or chef has suggested.
Oh, yes. It's thicker.
Mm!
That brings it to a whole new level.
It has that savory taste and also a little bit of sweetness.
And it's so comforting. It's like eating comfort food.
Oh, thank you so much.
How was that with rice?
Oh, it's wonderful with rice.
I can understand how the "teishoku" meal is set up
so that you can really enjoy the flavors of the rice and you can get a hearty meal.
Today, I introduced you to a basic "korokke teishoku."
But visitors to Japan will have a chance to try all kinds of "teishoku."
For instance, sashimi, grilled fish, and "tonkatsu."
There are also regional specialties found across Japan.
"Korokke" are made with simple, everyday ingredients.
So, instead of sugar and soy sauce, you can try different seasonings.
I hope viewers will enjoy making a variety of "teishoku" at home.
I believe it'll provide an insight into the rice culture of Japan.
Thank you so much for teaching us, chef.
Oh, I learned so much today.
Thank you so much. It was my pleasure.
Let's review today's recipes.
First, "korokke."
Boil potatoes.
Drain, add salt, and place over heat to dry the surface.
Mash while hot to make fluffy mashed potatoes.
Sauté ground beef and minced onions, and season with salt and pepper.
Add sugar and soy sauce and continue to sauté.
When cool, add flour and mix with the potatoes and shape into oval patties.
Dredge in flour, beaten egg, and "panko" to bread.
Make sure the "korokke" are completely covered with "panko."
Deep fry at 170 degrees Celsius.
Once they're golden brown, they're done.
Plate with plenty of vegetables.
Now for the miso soup.
Add miso to the "kombu" and "katsuo dashi," and then add the dried seaweed and "fu."
Ladle into soup bowls and garnish with "mitsuba."
Complete with rice and pickles. That's it.
Why not try putting together a "teishoku" - set meal yourself?
Come on, you can do it.