Authentic Japanese Cooking: Tomato Nikudofu
Indulge in the culinary arts with Chef Saito's original recipes: meat and tofu with juicy tomatoes, and tamagoyaki rolled omelet infused with nori. Join a class in flavorful Japanese cooking!
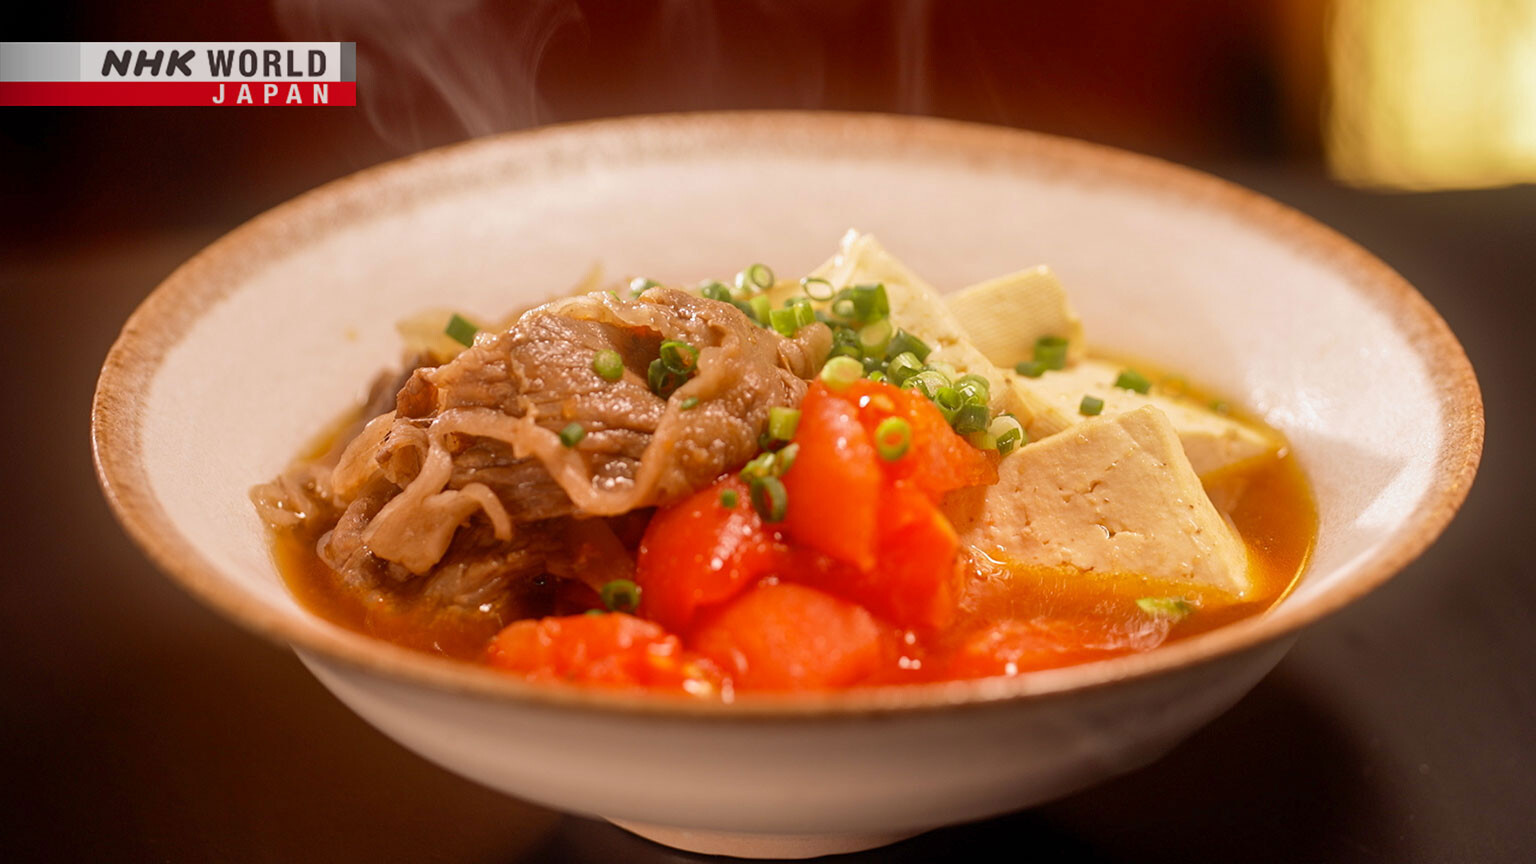
(1) Tomato Nikudofu
Ingredients (Serves 2)
350 g firm tofu
200 g beef
280 g tomato
180 g onion
5 g green onion
2 tsp vegetable oil
For the soup:
400 ml water
50 ml sake
1 tsp kombu tea
2 tbsp sugar
3 tbsp soy sauce
Directions
1. Cut the firm tofu in half, then into 2cm thick slices. Drain thoroughly.
2. Cut out the tomato's core. Make a deep, crisscross incision on the top of the tomato and blanch. Once the skin starts to curl up, place in a bowl of ice water to cool before peeling. Cut into pieces.
3. Cut an onion in half and cut out the root end in a V-shape. Cut into 3 to 4mm thick slices.
4. Sauté the beef in vegetable oil over medium heat. Add the onions and once they have reduced some, add water, sake and kombu tea and simmer over medium-high heat. Season with the sugar and soy sauce. After simmering for 2 or 3 minutes, add the tofu. Then, simmer for 2 to 3 minutes and add tomatoes. Simmer for 3 more minutes.
5. Sprinkle with chopped green onions and serve.
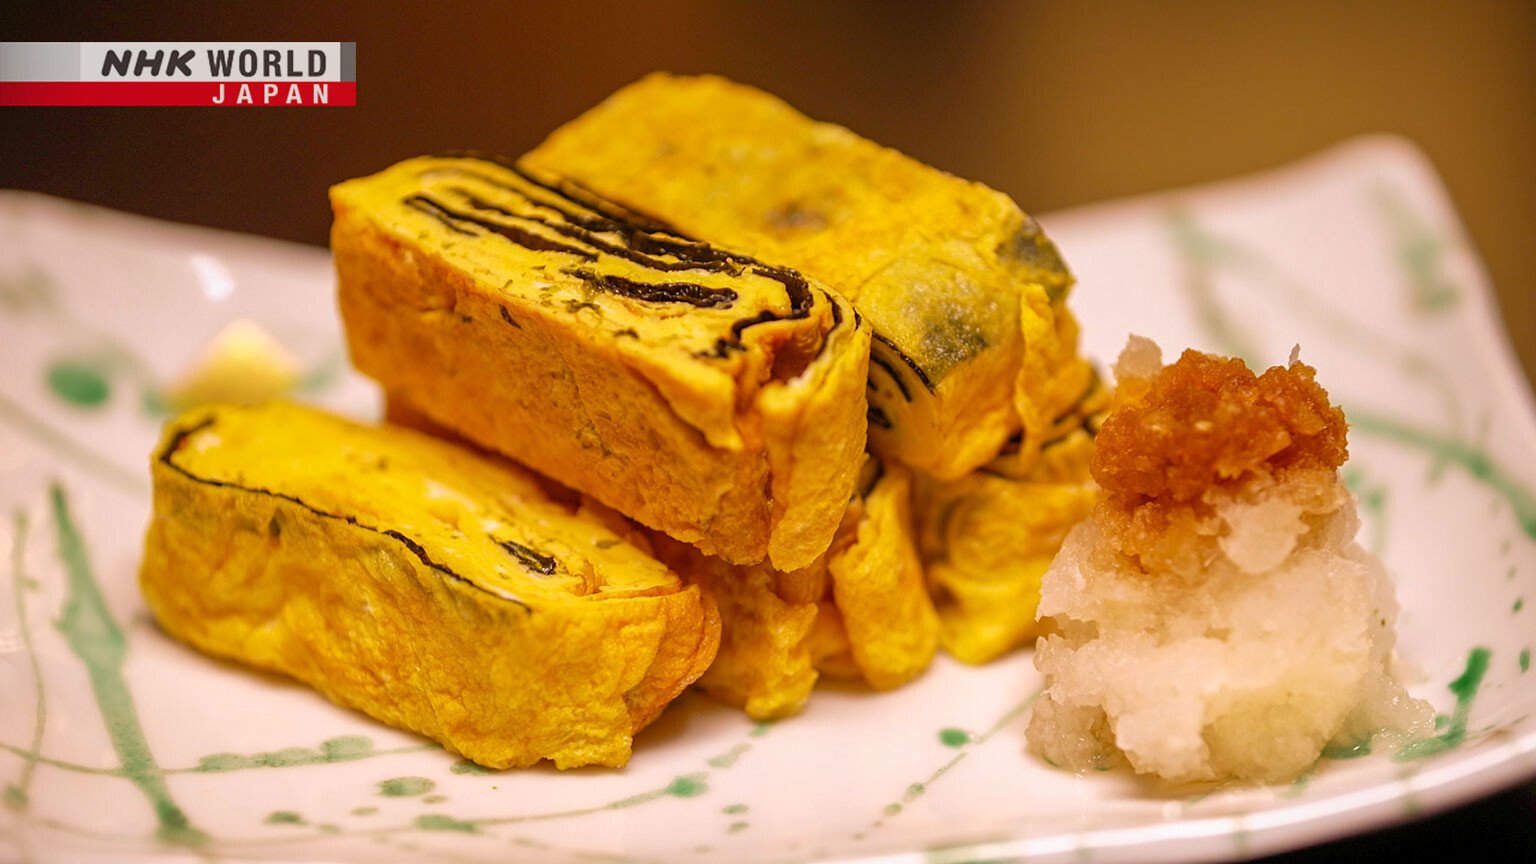
(2) Tamagoyaki with Nori
Ingredients (Serves 2)
3 eggs
10 pieces of seasoned nori
Salt, vegetable oil, grated daikon radish and soy sauce, as needed
Directions
1. Beat the eggs and mix salt into mixture. Place the pan over medium heat, add plenty of oil, and coat the pan evenly. Add a ladle of egg into the pan and spread it out in the pan.
2. Cover with 2 or 3 slices of nori. Lift the edge of the egg with your chopsticks and tilt the pan towards you and flip over.
3. Gently lift up the folded omelet and add the raw egg to run under it. Cover with more nori, then turn it over. Repeat this process 3 or 4 times.
4. Cut into easy-to-eat pieces and serve with grated daikon and soy sauce.
Transcript
Dining with the Chef!
Hello! Welcome to Dining with the Chef.
I'm your host, Yu Hayami and here is our wonderful Chef Saito.
Hello Yu, hello everyone!
- So Chef!
- Yes.
What will we be making today?
Today our main dish is "Nikudofu."
Oh that's a very popular home cooked dish in Japan.
Yes and popular "Izakaya" food.
That's right.
Tofu is usually, you know, kind of bland, but in this dish, it soaks up a lot of the rich flavor from the beef and the broth.
Yes and today we add tomato. Tomato "Nikudofu."
Tomato!
Oh I wonder how it's gonna taste in the "Nikudofu."
Yes, very good.
And what else are we making today?
"Tamagoyaki" rolled omelet with flavored "nori."
Oh... another of your special recipe.
Saito special.
Well that's sounds great, so shall we?
Yes, let's get started!
Japan is known for its bountiful fresh and delicious ingredients.
Amazing!
Japanese cuisine, guided by traditional culture that you will be able to prepare at home.
Perfect.
Today, Chef Saito's take on two home-cooked dishes:
Tomato "Nikudofu"
and "Tamagoyaki" with "Nori."
Let's join Yu Hayami and become Chef Saito's chef apprentices.
Here's our Master Chef, Mr. Tatsuo Saito!
Always entertaining with the Chef.
Authentic Japanese Cooking.
Here's what's cooking today.
Chef Saito adds tangy tomatoes to a popular dish: "Nikudofu."
The secret is to simmer the tofu, letting it soak up the delicious soup.
So today's main ingredients are tofu, beef and tomato.
Right.
"Nikudofu" is seasoned with soy sauce and sugar. It's bursting with flavor.
But today we're adding tangy tomatoes.
This makes for a refreshing, delicious soup.
Ah, sounds delicious.
Tomatoes are rich in glutamic acid, a component of umami.
That boosts the flavor of the meat.
Mmm, where shall we start, Chef?
So, prepare the tofu.
Today we are using firm tofu, "momen" tofu.
Right.
The two types of tofu popular in Japan differ in water content.
Firm tofu contains less moisture, so it's firm.
Silken tofu contains more moisture, so it's soft.
"Kinu-goshi" tofu or silken tofu has a smooth and silken texture.
"Momen-dofu" or firm tofu has a firm texture because the excess water has been pressed out.
I'm going to use firm tofu because it will soak up the umami of the beef.
Cut the firm tofu in half, and then into 2 cm thick slices.
Here is a tip from our Chef.
Drain the tofu thoroughly to allow the soup to seep in.
Cover a cooking tray with a paper towel and lay the sliced tofu flat.
Cover with a paper towel and top with another tray to sandwich the tofu...
Set aside for 10 minutes to press out any excess water.
- Next tomatoes.
- Yes.
Peel a tomato using the blanching method.
Peeled tomatoes are easier to eat.
- They also soak up the flavor of the beef and tofu.
- Yum.
Cut out the tomato's core.
Make a deep, crisscross incision on the other side of the tomato.
Meanwhile, bring a pot of water to a rolling boil.
Place the tomato in water and roll it gently.
This will loosen the skin so that it peels off smoothly.
Once the skin starts to curl up,
place in a bowl of ice water to shock it and to stop the cooking process.
Let it cool before peeling.
This is really fun.
You just peel the way like this. Oh.
- It feels good, doesn't it?
- Yes.
Now, cut the peeled tomatoes.
Cut into 6 equal wedges and then cut each wedge in half.
Looks good.
- Tomato is done.
- Done.
What's next?
- Cut the onion.
- OK.
Cut an onion in half and cut out the root end with a V-shape.
I'm sure beef and onion are very good together.
- Very good.
- Yes.
- Onion has natural sweetness.
- Yes, it does.
Cut each half into 3 to 4 milmeter thick slices.
So now that leaves us with the beef.
How are we going to cook that?
Yes, stir fry the beef, huh.
Add a dash of vegetable oil to the pan and place over medium heat.
And we use thinly sliced meat.
Like the beef used for "sukiyaki."
It's very tender. The marbled fat and tofu create a synergy of flavors.
Heat up the oil before adding the beef.
- Oh, that sound.
- That sound.
Sauté until it starts to change color. Then, move to the side.
And add the onions.
Keep on sautéing for a minute or two.
Oh it's starting to smell so nice.
Sauté the beef and onions separately so they don't mix.
- They've started to brown.
- Oh.
- They've wilted, too.
- Yes.
Once the onions have reduced some, add water and sake.
And now for another Chef's Tip!
After the sake, add "kombu" tea.
"Katsuo dashi" has a powerful umami that competes with the beef.
- So it's better to use "kombu" tea, for a mild, savory flavor.
- Right.
"Ko-bucha" or "kombu" tea is made by adding boiling water to a mixture of powdered kelp and salt.
Now it's different from the "kombu-cha" popular in the West.
- It's often used in cooking as a secret ingredient.
- Huh.
Add the "kombu" tea.
If your local store doesn't stock it, add a 5 cm square piece of "kombu" instead.
Gently skim off the surface residue that forms during the simmering.
- Make sure to simmer over medium-high heat.
- OK.
- Let it boil gently, but don't use a lid.
- Ah.
You don't want to trap any undesirable smells.
- OK and then seasoning.
- Yes.
Add sugar and soy sauce to make it taste like "sukiyaki."
- OK.
- OK, OK.
Wow.
And then tofu.
So how do we know when to add the tofu and tomato?
Wait until the onions are wilted.
- By then, the soup willbe full of umami from the beef and onions.
- OK.
Overcooking it will make the beef tough and dry,
so after simmering for 2 or 3 minutes, add the tofu.
- They'll start to soak up the flavor right away.
- Right away.
Simmer for 2-3 minutes.
It looks like the tofu has soaked up the soup.
- The tofu has absorbed the color of the soup.
- Yes.
Make some room for the tomatoes.
Try to keep the ingredients separate.
This will keep the tofu and tomatoes from breaking up, and it looks nicer when plated.
Oh and the color looks beautiful.
- Take standard dishes like "Nikudofu."
- Uh uh.
If you know the basics, you can experiment.
- Making new discoveries is part of the fun of cooking.
- Yes, yes.
- The tomatoes have softened and the tofu has absorbed the soup.
- Huh.
Mmm, delicious!
Simmer for 3 more minutes and it's done!
- Let's arrange to serve.
- Yey.
Chef Saito plates each ingredient separately.
First the tofu, then the beef...
- And tomatoes.
- Huh. Nice color!
Thank you so much.
- And then a lot of soup.
- Huh.
- Today soup is very important.
- Yes.
Finally, a sprinkling of chopped green onions.
Ok, tomato "Nikudofu" - it's done.
"Tamagoyaki" or a Japanese rolled omelet, is another all-time favorite.
To this dish, Chef Saito has added seasoned "nori" to make a cute yellow and black striped "Tamagoyaki."
"Tamagoyaki" is extremely popular home-cooked meal, basically it's rolled egg omelet.
- Omelet
- Right?
- Yes and very good for "Bento."
- Yes.
And today we are making Chef Saito's original recipe which we will add "nori."
- Today flavored "nori."
- Ah flavored.
"Ajitsukenori!"
Seasoned "nori" or seaweed is flavored with soy sauce, sugar, "mirin" and more.
It's a staple for breakfast or set meals and goes very well with rice.
You place a sheet over hot rice and roll it up with chopsticks and have at it.
The combination of "nori" and soy sauce is amazing.
When added to a beaten egg, it becomes moist and easy to roll.
Well, of course I have made "Tamagoyaki" many times, but today Chef, I would like to learn some techniques from you.
- Please watch.
- Yes.
- Don't miss it.
- OK, I will watch you. I will not blink.
Beat the eggs using long cooking chopsticks to "slice" the egg-whites.
The idea is to minimize air bubbles from forming that would prevent smooth, even layers.
- And also just a little salt.
- OK, right.
No need to add anything else.
The "nori" is already seasoned with soy sauce and "mirin,"
so the "Tamagoyaki" doesn't need much else.
Once the eggs are mixed, let's start cooking and rolling.
Well, hold on a sec! Here's another tip from our Chef!
The key to making good "Tamagoyaki" is to use lots of oil.
Let's see how it's done.
Place the pan over medium heat, add plenty of oil, and use a paper towel to coat the pan evenly.
Dip the tip of the chopstick in the egg and drizzle onto the pan to test the heat.
- It cooks right away.
- Oh yes.
This indicates that the temperature is high enough.
- OK, one ladle.
- One ladle.
Sound is very important.
Add a ladle of egg into the pan and spread it evenly.
Today, we're using a dedicated "Tamagoyaki" pan, but a regular frying pan will do just fine.
While the egg is still soft, cover with 2 or 3 slices of "nori."
Then, flip over.
Oh, did you see that? That's important.
This chopsticks and then go up and down.
Let's take another look.
Lift the edge of the egg with your chopsticks
and tilt the pan towards you, raising your arm from the shoulder and fold over.
Let's take a look at it from the side.
Bring the pan up to your face and use centrifugal force, to flip the egg over.
Then add another layer of egg and "nori."
Coat evenly with a generous amount of oil,
test the temperature, and add a ladle of egg.
Gently lift up the folded omelet so that the raw egg runs under it.
Cover with more "nori."
"Nori" is crisp, but when cooked like this it absorbs the beaten egg.
It becomes moist and tasty.
What's more, the omelet becomes infused with the aroma of "nori."
After greasing the pan, make sure to test the heat once again.
If it's too low, the egg will stick to the pan.
Add the egg, cover with "nori," and flip over.
Repeat this process 3 or 4 times.
Finally, tilt the pan towards you and use your chopsticks to press the omelet for several seconds to tidy up the shape.
OK.
Oh, OK - it's done.
Wonderful!
OK Chef, now it's my turn.
- OK.
- OK.
Stir the eggs thoroughly.
Using a slicing motion to avoid making bubbles as air will keep the eggs from firming up.
Add salt, mix, and start cooking.
But first, test the heat.
- Let's see it's ready? OK?
- OK.
It looks ready.
So check the temperature - it's ready...
- and then we do.
- You let the temperature drop.
That's right, Yu.
After checking the temperature, you shouldn't have added oil.
This caused the temperature to drop.
So, let it heat up for a moment and then, test the temperature again.
OK, I just leave that, right?
Add a ladle of egg mixture.
Oh, sound is good.
OK, a little more.
- Yes, then quickly.
- Quickly.
Move the egg.
- And then, we add the "nori."
- "Nori."
Add "nori."
- Oh, now we have to hurry.
- OK, hurry.
- Use the chopsticks.
- Oh, oh.
Hahaha.
- Up and down.
- Oh.
Good job!
And then, we have to check the temperature.
It's OK and we have to do this - add the 2nd ladle for egg
and then lift up the egg and make sure it goes underneath.
- More.
- More.
It's OK.
- And then, we add the "nori."
- "Nori."
Oh, just having just having one more step really takes up a lot of time.
OK, and then we turn it over.
- Oh.
- Oh.
There is a hole here, but it's OK, right Chef?
- Yeah.
- Yeah.
Don't worry about any holes.
They'll be covered with the next layer of egg.
But do be careful with the final layer.
- OK, and then we lift up the egg.
- Higher!
Let the egg run under to cover the bottom.
Ah, and then the "nori" again.
OK, just sprinkle "nori."
- Careful. It's the final layer.
- Oh my gosh.
OK, well it's too late now - it's kind of crooked but that's OK.
And finally, tilt the pan and press the omelet for a few seconds to tidy up the corners.
- Is it done?
- It's done.
All right, yey!
- Let's cut.
- OK!
Cut into easy-to-eat pieces about 2 to 3 cm thick.
OK.
So fancy!
Stripes of "nori."
The "nori" forms all sorts of fun, swirling patterns. It's pretty.
So, I'm gonna cut this.
The pattern and the amount of "nori" varies from piece to piece.
That looks good, Chef.
Make the most of the stripes when plating.
So, we serve it with the "nori" stripes showing right?
The variety adds an interesting touch.
And then served with grated "daikon."
Grated and slightly drained "daikon" radish is a standard garnish that goes very well with "Tamagoyaki."
- This is nice accent.
- Yes.
- A lot.
- A lot.
Oh I love grated "daikon."
- And then soy sauce.
- OK.
Chef Saito has stacked the "Tamagoyaki" to show different angles.
- So, is it important to make the "daikon" triangular?
- Right.
- When forming a triangular shape, you squeeze out the excess moisture.
- Ah.
You drain the "daikon" by exerting pressure on three points.
OK, this looks so yummy.
Yu stacks the "Tamagoyaki" to showcase the stripes.
Very nice!
- Yey.
- And finished.
- It's finished.
- Oh, Yu-chan also nice.
Both dishes are now ready to serve.
Enjoy the "Nikudofu," every single morsel. Love it.
Today we have two popular, everyday Japanese home cooked favorites, which are Chef Sato's recipes.
- Yes.
- Yes.
And I love how you always think about the balance of the colors.
I mean, it's bright with yellow and red, you know, very festive.
- Very fantastic.
- Yes.
- So, may I try?
- Please.
- OK!
- "Nikudofu." Tomato "Nikudofu."
So in Japan, we're allowed to hold our bowls up.
So I'm going to try the tofu first.
Mm mm.
Oh, this is delicious!
The tofu soaked up all the richness and the delicious soup flavors.
And the soup I thought would be a little sweeter, but it's actually not.
It's delicious.
OK, I'm going to try the "niku," the meat.
Mmm... That is delicious!
Very soft.
- And you can taste the sweetness from the onion.
- Onion, like "sukiyaki" and like "gyudon."
Exactly.
And finally, the tomato.
Oh, that adds a really nice touch to it.
It's a bit tart, so it makes it very refreshing.
- Refreshing.
- Yes.
- Not too heavy.
- No, not heavy at all.
And you said that I should taste the sauce as soup.
- Hmm.
- Hmm.
My favorite.
It's so light. Wow.
- That's really...
- Broth is so light.
Yeah, it's really nice.
Okay.
Oh, and then we had to try my "Tamagoyaki."
This is so cute, Chef - with the black and yellow stripes.
I must try it as is.
Hmm.
Wow! I've never had seaweed with "Tamagoyaki."
- It adds great flavor to it because we only added salt.
- Just salt.
Yes, but as you bite into that "Tamagoyaki," you have that wonderful taste of "nori," the seaweed.
It really permeates in your mouth.
- You can add different ingredients like baby sardines or seasoned cod roe.
- Really?
Now I can have it with grated "daikon."
The flavor is different.
- Yeah.
- I agree.
So this is wonderful because you taught us how to add a twist to our everyday favorites.
- So much fun experimenting with sort of favorite recipes.
- Thank you.
You have to master the basics of cooking.
- Then you can have fun experimenting.
- Right.
Today, I used green onions.
You could also try using herbs to make it even more refreshing.
Playing with a basic recipe will help expand your repertoire.
- So have fun cooking.
- Yes.
Thank you so much for teaching us today, Chef Saito.
Thank you. My pleasure.
Let's review today's recipes!
First, the Tomato "Nikudofu."
Drain and prep the tofu.
Blanch and peel the tomato so that it soaks up the soup.
Sauté the beef and onions.
Add water, sake, and "kombu" tea to make a mildly flavored soup.
Season with sugar and soy sauce, add the tofu and tomato, and it's done.
Enjoy the refreshing taste of Tomato "Nikudofu."
Next, "Tamagoyaki" with "Nori."
Mix salt into beaten eggs and add to a well-heated and greased pan.
Cover with seasoned "nori," flip over, and repeat the process to form the "Tamagoyaki."
Garnish with grated "daikon" to serve.
Why not try your hand at these classic Japanese dishes!