Authentic Japanese Cooking: Anago Sushi Stick
Learn about Japanese home cooking with Master Chef Saito, based on traditional Japanese cooking techniques! Featured recipes: (1) Anago Sushi Stick (2) Clear Kamaboko Soup.
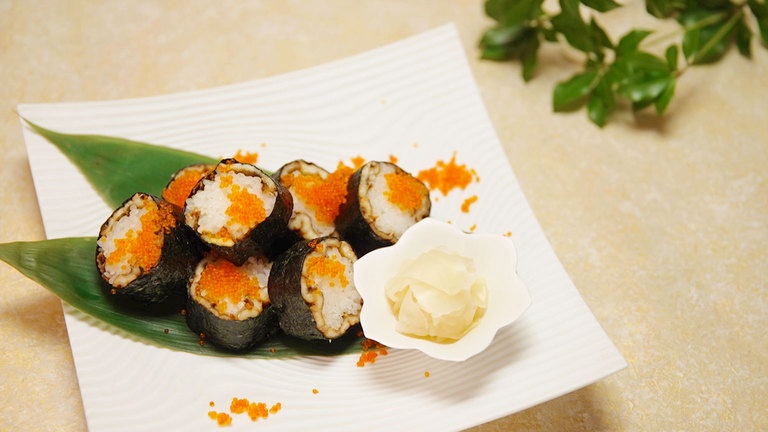
(1) Anago Sushi Stick
Ingredients (Serves 2)
8 grilled Anago (saltwater eel)
2 tbsp Tobiko (fish roe)
4 sheets nori (roasted laver seaweed)
360 ml rice
3 cm square piece of kombu
60 ml rice vinegar
30 g sugar
10 g salt
Sweet-pickled ginger, as needed
Wasabi, as needed
Directions
1. Mix the vinegar, sugar and salt to make the sushi vinegar and mix into piping hot rice cooked with kombu.
2. Lay 4 grilled Anago (saltwater eel) on a rolling mat covered with a damp cloth. Place the sushi rice on them.
3. Roll and tidy up the ends and make a sushi stick. Wrap the sushi stick with nori in a rolling mat again.
4 Toast the stick in a frying pan lightly. Cut into bite-sized pieces and sprinkle with Tobiko (fish roe).
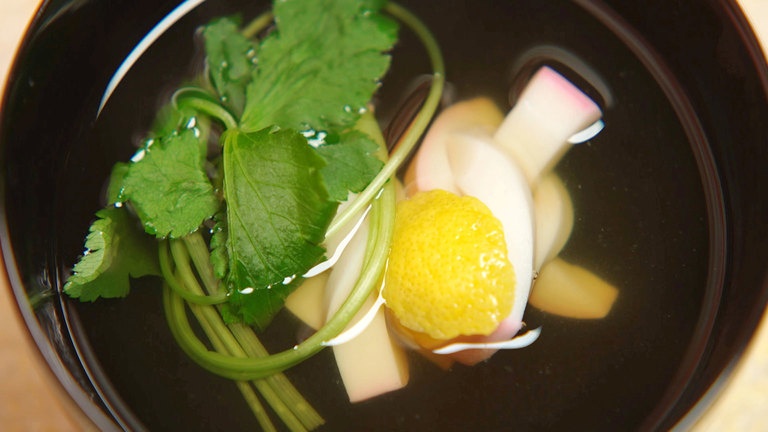
(2) Clear Kamaboko Soup
Ingredients (Serves 2-3)
1 red and 1 white Kamaboko
20 g mitsuba (substitute w/ cress)
Lemon peels, pesticide-free, as needed
400 ml dashi
1/2 tsp soy sauce (Usukuchi)
A pinch of salt
Directions
1. Cut and tie the Kamaboko into a decorative knot.
2. Tie the mitsuba.
3. Heat the dashi in a pot. Season with soy sauce (Usukuchi) and the salt.
4. Add the Kamaboko and mitsuba. Serve in a soup bowl with a sliver of lemon peel, to taste.
Transcript
Dining with the Chef.
Hello and welcome to Dining with the chef!
I'm your host Yu Hayami, and, here is our wonderful chef Saito!
Hello Yu, hello everyone.
So chef, what are we going to be making today?
So today, "Bo-zushi" with "anago" eel.
I love sushi made with "anago" or conger eel. Now, "bo" means like a bar or a stick.
Yes, stick.
So, today we use a "makisu" rolling mat with sushi rice, and, then roll them up into a stick.
Right.
We also have a clear soup.
- Japanese soup go very well with sushi.
- Yes, they are very nice together.
A combination— best friends.
Best friends, like you and me.
Well, I can't wait! Shall we, chef?
Yes, let's get started.
Japan is known for its bountiful fresh and delicious ingredients...
as well as unique seasonings and flavors.
All coming together with creative cooking techniques to produce a well-designed and colorful menu.
Japanese cuisine, guided by traditional culture that you will be able to prepare at home.
Let's join Yu Hayami and become Chef Saito's chef apprentices.
Here's our Master Chef, Mr. Tatsuo Saito!
Never a dull moment.
Today, an "anago" sushi stick and a clear soup with "kamaboko."
Authentic Japanese Cooking Here's what‘s cooking today.
"Anago" sushi sticks are wrapped in "nori" infused with the fragrance of the sea.
The bright orange "tobiko," or flying fish roe, adds a festive touch.
So today we're gonna start by preparing the "anago" eel, right?
Yes. Today, we use salted and grilled.
Today we'll be using "anago," or conger eel, grilled with salt.
"Anago" is very popular in Japan.
"Anago" sushi and tempura are especially delicious.
It should be high up on your list of foods to try when you have a chance to visit Japan.
Chef, what would be a good substitute for "anago," if it's not available?
Whatever you like. Sushi rice
goes well with just about everything.
OK.
Since it's going to be rolled with rice into a stick shape, it's best to choose a topping that's soft and about five millimeters thick.
Thinly sliced meat or fish will make for delicious sushi.
If you're using fish, make sure to remove all the bones.
I'll show you how to make delicious
stick-shaped sushi at home!
First, we need to prep the "anago."
The skin is quite tough.
That would make rolling the sushi
quite difficult.
Lay your blade flat and lightly tap over the skin.
- This makes it fluffy.
- I see.
Little things make a
big difference in cooking.
OK, the anago eel's done.
Now, the all-important sushi rice.
Pour the rinsed rice into a rice cooker, add the appropriate amount of water and cook along with a 3 cm square piece of "kombu."
Make the sushi vinegar by mixing the rice vinegar, sugar, and salt until the particles are no longer visible.
Empty the cooked rice into a bowl and mix with sushi vinegar while hot.
This mellows the sharp taste of vinegar.
Use a cut and fold motion to mix the sushi vinegar and rice.
It's very important, this cutting motion.
Never like this.
Don't smash the grains.
See how the grains are separated?
The cooked rice is plump and chewy, but the vinegar coating separates the grains and keeps the rice from becoming sticky.
OK. Let's roll with this rolling mat.
This is a "makisu," a Japanese cooking utensil used to roll sushi.
The makisu makes it easy to make neatly shaped rolls.
Is there a front and back? Which side are we supposed to use?
This side is flat. But today, we're
going to use the other, rounded side.
The "makisu" has a flat side and rounded side.
The flat side is good for making square shapes.
But since we're going to make a rounded-stick shape, we'll be spreading the rice on the rounded side.
Let's cover the mat with a dampened
cloth. This helps to make a tight roll.
Dampen your hands with vinegared water
and lay the "anago" across the cloth.
A dash of vinegar added to water is used to make "tezu," or dipping water.
This keeps your hands from getting sticky when handling rice and other ingredients.
Place the "anago" alternately.
The tail is thinner than the head.
So, place the "anago" alternately, skin side up.
Here is our Chef's Tip!
A trick to forming a neat and tight roll.
Leave 3 to 4 millimeters of space
between the "anago."
In order to make a neatly formed roll, leave a few millimeters of space between the anago.
Dampen your hands again.
Now for the rice. Take a handful of rice
and shape into a ball.
This removes the air.
Toss the rice ball between your hands and tap it lightly.
This releases the air between the rice grains, allowing the grains to stick together so that it's easier to shape.
Place in the center of the "anago."
Place the rice ball in the center, in between the second and third "anago" strips.
Some more rice.
Add enough rice to cover the length of the "anago."
Hold both sides with the fingers of one hand, and press down with the other hand to form a rectangular shape.
OK, let's roll.
Bring the mat over so that the edges
of the "anago" match up.
Match the sides of the anago and press down firmly.
Lift the mat and roll the sushi away from you and press down again.
This is what it looks like from above.
Lift the mat as you roll the sushi away from you and press down.
As you press down, the rice is
pushed out from the side.
Shift the roll so that one end extends outside the mat and tuck the rice back in.
Do the same for the other end as well.
Let the rolled sushi rest for 3 to 4 minutes.
This allows the "anago" and rice to mesh.
Now it's your turn, Yu.
Lay the mat round side up and cover it with a damp cloth.
Use a sterile, tight mesh cotton cloth, preferably unbleached.
Lay the anago skin side up, leaving a space of about 3mm in between.
Grab some rice and we make a rice ball.
- To remove the air inside.
- OK.
Shape into a long oval and place in the center of the "anago."
OK. So, I press this, and then I have to hold it.
Oh my goodness! Look at that it's getting longer.
Place enough rice to cover the length of the "anago."
Now, let's roll it.
I take the ends here.
- I know I have to make this end match up with that end.
- Right.
Together with the rice.
- Oh, Sensei! Are you OK?
- It's OK. It's perfect.
- Is it matching?
- Keep on going!
And I have to pull and...
Press down.
With both hands.
Open.
Roll over and press down again.
- This part is so difficult.
- Open.
And then let it roll.
Tidy up the sides, rewrap in the mat, and set aside for a while.
OK, you are so good at teaching.
Ah it's fun! Thank you so much for teaching me. Very fun.
Please try it.
OK, let's open it.
Ta-da!
Oh perfect.
And now, I use the "nori."
We're now going to wrap the sushi in "nori" sheets of dried, edible seaweed to infuse it with the fragrance and flavor of the sea, and, give it extra crispy texture.
Lay enough "nori" to cover the length of the sushi.
Place the "nori" along the edge
nearest you.
Place the sushi roll along the edge of the "nori."
The width of the "nori" matches the length of the sushi.
Roll up the sushi, "nori," and all.
Oh, OK.
Let it rest for 3 to 4 minutes.
The moisture of the "anago" will adhere to the "nori."
- If you open it now, it'll come apart.
- Right.
Now, it's your turn, Yu.
Place the sushi on the "nori."
Here we go, 1,2,3! Ahhhhh.
OK.
And then I just roll. Oh I can hear that "nori" going "pariparipari."
Ah so much technique, OK.
Let the roll rest for 3 to 4 minutes.
OK, Yu-chan. Next step.
Open the "makisu" and dampen the edge of the "nori" to seal the roll.
Roll it up.
Press together with both hands as you did with the "anago" and rice.
The dampened nori will then adhere firmly to the sushi.
Can we eat it now?
- Not yet. First, fry in the frying pan.
- What?!
We are going to cook it?
Yes. So, crispy sushi today.
Here is our Chef's Tip!
Crisp the "nori" to boost the texture and flavor.
Place the pan over medium heat.
Place the roll seam side down.
Place the roll seam side down to toast and seal it.
Once the color of the "nori" starts to change, turn the roll over and toast the entire roll.
Oh, I can smell this.
The nori fragrance.
Toasting the "nori" brings out its fragrance.
Once the surface is crisp, turn off the heat.
Let's cut.
Yes.
So, we need a wet towel.
OK, we need a wet towel.
Wipe the knife with a damp towel to keep the rice from sticking to it.
Here is our Chef's Technique!
A nifty way to cut the soft sushi without ruining its stick shape.
Move the tip back and forth and then tap.
Use short strokes to move the tip of the blade back and forth and then tap to separate the slice.
So cute.
OK, this is good. It's done.
The cross section looks like a flower.
Now, it's your turn, Yu.
- So,let's see... let's open it up first.
- Yes.
- Let's roll it. Wow...
- Good.
- Moisten.
- Ahahahaha.
I was like, what's this for?
OK, you have to put a lot of it so that it sticks.
- To seal the seam.
- Right. OK.
And then, I roll it.
And then, you went "hmph."
No need.
I'm just kidding.
- It looks like lacquer black, you know, it has that shine, that gloss.
- Well said.
Cooking involves all five senses.
And you like... Ah that's hard.
You need to cut deeper.
Cut deeper and tap to separate.
- More?
- More, more more more... OK! And then "bam," good.
Wow! Look at that chef! It looks so good.
OK, yay!
So, let's arrange to serve.
OK.
So, we have "gari" or sweet-pickled ginger, as well as this orange thing.
"Tobiko."
The bright orange "tobiko" is the roe of flying fish.
It's a popular sushi topping.
- California roll.
- California roll has it too, yes.
I have no idea about this fancy staff.
Bamboo leaves are often used
to plate sushi.
They convey a clean and refreshing image.
Yu decides to plate the sushi to show the cross section.
Chef Saito sprinkles "tobiko" over the sushi to make it look attractive.
And, we are finished!
Next, a clear soup that goes very well with sushi.
Chef Saito is going to add a decorative touch using "kamaboko."
The main ingredient is "kamaboko."
It's made by adding salt and other seasonings to fresh white fish paste, which is then formed into a semi-cylindrical shape and steamed on wooden boards.
Red and white are considered to be auspicious colors and are often used to plate food.
Today, let's do something special with "kamaboko."
OK.
Fancy cuts.
Here is our Chef's Technique!
Cut the "kamaboko" into decorative shapes and designs.
Use the back of the knife to remove the "kamaboko" from the board.
Chef Saito is going to demonstrate 3 decorative cuts.
First, the "ichimatsu" checkered pattern.
Cut the pink and white "kamaboko" into 7 to 8mm slices.
Cut each slice in half and stack together, alternating the colors.
Next, the "nejiri" twisted pattern.
Cut the pink "kamaboko" into 7 to 8mm slices.
Peel the pink part leaving a bit at the end.
Making a slit through the peel and twist both strips.
And now, the "musubi" or knot.
Cut the pink "kamaboko" into 7 to 8mm slices.
Slit the center, then make a staggered cut on both sides.
Insert both ends into the center slit, from opposite sides.
- Oh beautiful.
- "Musubi:" to shake hands; everybody is happy.
Yes, "musubi" is like to be united, to be together.
A bit of ingenuity can transform a plain slice of "kamaboko" into a beautiful decoration.
Let's use the "musubi kamaboko" to make a clear soup.
Make the all-important "dashi" with "kombu" and "katsuobushi" skipjack shavings.
Wipe the surface of the "kombu" to remove any dirt and dust.
But don't wipe off the white powdery substance.
Pour the water into a pot, add the "kombu" and place over medium-high heat for ten minutes to extract the "umami" flavor.
Once it boils, simmer for 30 seconds and remove the "kombu."
Add water to stop the boiling.
Add the "katsuobushi," and return to a boil.
Skim off the surface residue while simmering for 20 more seconds.
Turn off the heat and wait for the "katsuobushi" to sink.
Filter through a strainer lined with paper towels.
And now, you have a beautiful golden "dashi."
Let's add "mitsuba."
"Mitsuba" is so nice.
It's a must have Japanese herb when you make clear soups and it goes really well with "dashi."
Tie the "mitsuba" into a lucky "musubi," or knot.
Cut to equal lengths and soften the stems with your fingers.
Make a loop and pass the leaves underneath to tie into a loose knot.
Now, let's season the "dashi."
Add the seasonings a little at a time
or you'll end up with a salty soup.
Heat the "dashi," add salt and "usukuchi" soy sauce in increments.
And we have to check the taste.
Yes.
- It tastes bland.
- Oh.
You don't want to ruin the color,
so add more salt not soy sauce.
Adjust the flavor and heat up the "kamaboko" and "mitsuba."
Place the "kamaboko" and "mitsuba" in the soup bowls.
Oh that's beautiful. Look how auspicious that looks. That looks wonderful.
Both the ingredients are tied
into an auspicious knot.
The color is also very important.
"Kamaboko" is red and white, and "mitsuba" is green in color.
Finally, a sliver of lemon peel to add color and fragrance.
- Interesting! We are gonna add lemon peel.
- Yeah.
An accent color, and it's also so nice.
That's nice.
OK, this is clear soup.
And it's finished.
Both dishes are now ready to serve.
Time to enjoy these two stunning dishes.
What a gorgeous spread we have today.
I decided to put my "tobiko" on the side.
But your plating looks beautiful.
Vivid orange pops up with bright colors.
That looks very festive.
Yu-chan, yours is also good.
And, you know, I kind of wanted to leave the sushi as is because I wanted everyone to see the beautiful flower.
First, no "shoyu."
I'm going to try it without any soy sauce.
Hmm.
The "tobiko" has a really fun texture.
It pops in your mouth.
Pop, pop, pop.
And the "nori."
It has such a nice fragrance of the sea.
- It's wonderful.
- Thank you.
And the "anago" is very simple, but because it's grilled, it has a smoky flavor and it really, oh, it's so wonderful.
It goes really well with the sushi rice.
The flavors burst in your mouth.
Stick-shaped sushi is a synergy of
different flavors and textures.
Wasabi soy sauce goes well with sushi.
Add as much or little as you like.
And I'm going to add a little bit of it to my sushi.
That's really nice. That wasabi has a little kick.
Yes, it has a kick.
It's wonderful.
OK. So next, I'm gonna try some soup.
Oh, smells so nice.
Ah it's wonderful. Okay.
Oh, it's sweet. I wonder why it's sweet.
Because today, we used "kamaboko."
The sweetness comes from the fish paste.
- Clear soups go well with sushi.
- I know, it's so nice.
So simple, but it's nice to have something warm because the sushi is not warm.
- It's a nice pairing.
- This is perfection.
I'm gonna try my favorite "mitsuba."
Umm, very refreshing. Very crunchy.
Because the "kamaboko" is nice and soft, this has more texture.
Very nice.
Japanese cuisine is all about
providing maximum pleasure.
That's why the sushi is wrapped in "nori"
to add more texture and fragrance.
Ideas like this can go a long way
towards making food more enjoyable.
And I hope you'll have fun
coming up with your own ideas.
And Chef Saito, today, I learned a great lesson on how to make rolled sushi, so that was wonderful.
Thank you so much.
Well, it's very delicious. I'm gonna...
I'm gonna have some more of the "tobiko."
This is so nice.
- Thank you for joining me.
- Yes.
- And you like "tobiko?"
- I love "tobiko!" It's so good.
Okay, let's review today's recipes.
First, the "Anago" Sushi Stick.
Mix the vinegar, sugar, and salt to make the sushi vinegar and fold into piping hot rice.
Soften the "anago," lay it on a "makisu" covered with a damp cloth, and add sushi rice.
Use the "makisu" to make a sushi roll and tidy up the ends.
Then, let it rest for a while before wrapping with "nori."
Toast the roll in a frying pan.
Cut into bite-size pieces and sprinkle with "tobiko."
Next, the clear soup with "kamaboko."
Cut and tie the "kamaboko" into a decorative knot.
Tie the "mitsuba" as well.
Season the "dashi" with salt and "usukuchi" soy sauce, and add a sliver of lemon peel.
And you are finished!
Why not try these decorative and oh-so delicious recipes at your house?