Authentic Japanese Cooking: Dashimaki Omelet
Learn about Japanese home cooking with Master Chef Saito, based on traditional Japanese cooking techniques! Featured recipes: (1) Dashimaki Omelet (2) Kayaku Rice.
(1) Dashimaki Omelet
Ingredients (Serves 2)
6 eggs
Grated daikon radish, as needed
Soy sauce, as needed
Vegetable oil, as needed
100 ml dashi
2 tbsp mirin
1 tbsp Usukuchi soy sauce
A pinch of salt
Directions
1. Mix the beaten egg with dashi seasoned with Usukuchi soy sauce, mirin and salt with chopsticks.
2. Pour some of the egg mixture into a well-oiled pan. Once the egg is no longer runny, use your chopsticks to flip the roll by tilting the pan towards you. Repeat this process until you've used up all the egg.
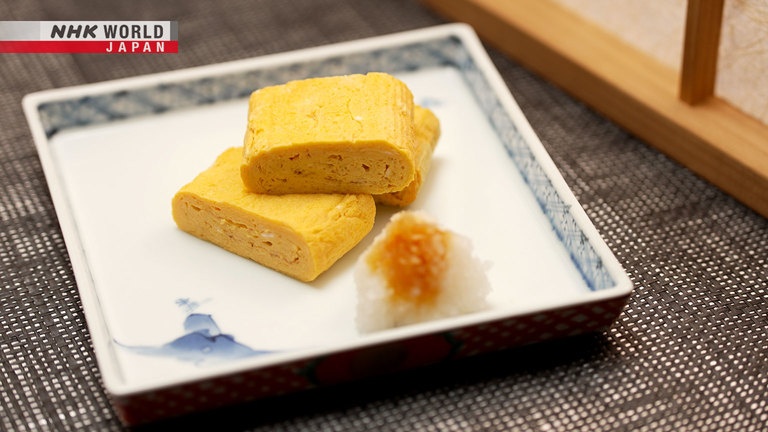
3. Roll the omelet with a bamboo mat and cool. Cut and serve with grated daikon radish and soy sauce.
(2) Kayaku Rice
Ingredients (Serves 2-3)
90 g chicken thigh
40 g shiitake mushrooms
50 g carrot
30 g Abura-age
70 g Konnyaku
4 green beans
300 g rice
350 ml dashi
2 tbsp mirin
2 tbsp soy sauce
Directions
1. Cut the chicken into 2cm cubes. Blanch them and drain.
2. Dice the remaining ingredients into 1cm cubes.
3. Rinse the rice and put in a rice cooker. Add water and the seasonings. Stir. Place other ingredients except the green beans on top and turn on the rice cooker. Boil the green beans with salt.
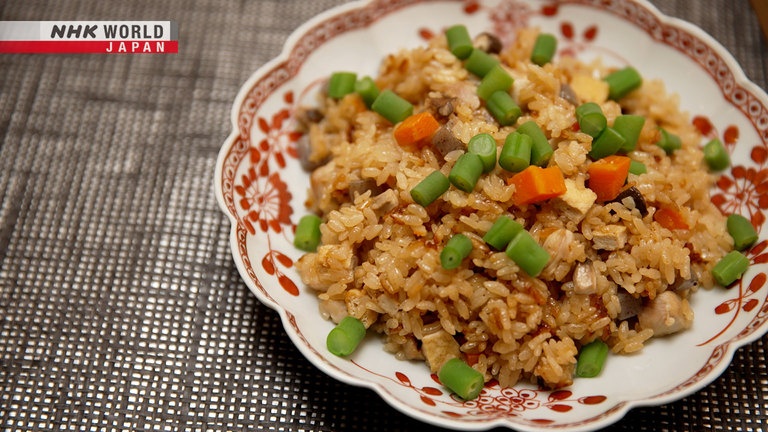
4. Garnish with green beans. Serve.
Transcript
Dining with the Chef!
Hello and welcome to Dining with the Chef.
I'm your host, Yu Hayami, and here is our wonderful Chef Saito!
Hello Yu, hello everyone.
So chef, what's on the menu for today?
Today, first, "dashimaki tamago" omlet.
Wow, I love "dashimaki tamago" omlet.
It's a rolled omlet with flavorful "dashi" stock for deep savory flavor.
Yes. The most basic of Japanese cooking.
That's right.
I really love it and the "dashi" makes it very juicy, moist, and it's delicious.
We use many Japanese cooking technique.
Don't miss it.
Okay, are we making anything else?
Yes, "kayaku" mixed rice.
Today, we use the chicken.
Both are super popular Japanese cooking.
Well, then shall we?
Yes, let's get started!
Japan is known for its bountiful fresh and delicious ingredients...
...as well as unique seasonings and flavors.
All coming together with creative cooking techniques to produce a well-designed and colorful menu.
Japanese cuisine, guided by traditional culture, that you will be able to prepare at home.
Let's join Yu Hayami and become Chef Saito's chef apprentices.
Here's our Master Chef, Mr. Tatsuo Saito!
Always an adventure!
Today's dishes showcase the basic techniques of Japanese cuisine.
Authentic Japanese cooking.
Here's what's cooking today.
As the name "dashimaki tamago" suggests, the rolled omelet contains a lot of "katsuo" and "kombu dashi."
It takes a lot of skill and experience to roll something so delicate.
So let's watch how Chef Saito makes this classic dish.
So, first, we start by breaking the eggs like so.
Yes, use a lot of eggs.
We want to make a juicy rolled omelet
that is as fluffy as a sponge.
- So, we need a lot of eggs.
- Okay.
"Dashimaki tamago" is incredibly juicy and fluffy because it contains a generous amount of umami-rich "dashi."
Because it has such a high liquid content, the omelet won't set easily and is quite wobbly.
It takes a lot of practice to make a beautiful "dashimaki," bursting with flavorful "dashi."
It's important to mix the eggs properly.
- It's not easy.
- Right. So please teach me.
Yeah, of course.
First, beat six eggs and cut the white with chopsticks.
Cut motion.
So, why do we do this in the cutting motion?
If you mix like this, the eggs just
spin around, so it takes longer.
The "dashi" won't be properly absorbed.
It's important to keep out the air.
Just a little white left.
Okay, enough.
Nice! Okay.
You see just a little white eggs?
Oh... yes. I can see it.
You don't need to fully incorporate the egg yolks and whites.
Okay, so I'm going to mix the eggs and cut it.
Like this?
You don't want to beat the eggs.
Instead, scrape the bottom of the bowl.
Like this.
So, you can't use the electric mixer, right?
No. That will let air in.
- If you aerate the eggs, they won't absorb the "dashi."
- I see.
- It's Okay.
- Oh, Okay.
The flavor comes from the "dashi," made with "kombu" and "katsuobushi" skipjack shavings.
Wipe the surface of the "kombu" to remove any dirt and dust.
But don't wipe off the white powdery substance.
Pour water into a pot, add the "kombu," and place over medium-high heat for ten minutes to extract the umami flavor.
Once it boils, simmer for 30 seconds and remove the "kombu."
Add water to stop the boiling.
Add the "katsuobushi" and return to a boil.
Skim off the surface residue while simmering for 20 more seconds.
Turn off the heat and wait for the "katsuobushi" to sink.
It's important to do this as soon as possible to keep the "katsuobushi" from releasing any unpleasant flavor.
So once the "katsuobushi" sinks, filter the liquid, and you have a delicious "dashi."
Mix the dashi, then cool it.
It is very important.
Right.
Hot "dashi" will cause the eggs to set.
- So, make sure it's cold.
- Okay!
Before adding the cold "dashi" to the eggs, season with "mirin," "usukuchi" soy sauce, and salt.
We're using light colored "usukuchi" soy sauce to keep the attractive yellow color of the eggs.
Mix until the salt is fully dissolved like this.
Then combine with the eggs.
Then mix again.
Mix until the egg whites are
no longer visible.
- The egg whites absorb the "dashi."
-Interesting.
So, mix well using a cutting motion to
fully incorporate the "dashi" and eggs.
If you cut corners here,
your "dashimaki" tamago will flop.
Okay, Chef Saito, I'm going to make my sauce, too.
Combine the "dashi," "mirin," "usukuchi" soy sauce, and salt.
Then mix with the eggs.
- This is the most step of all. Egg dishes are deceptively easy.
- I know. Yes.
It requires a lot of technique.
- Western omelets, too.
- Yes.
Okay, I think it's okay. Perfect.
Yay! Done.
This is enough to make two rolled omelets, so divide into equal amounts.
I've added as much "dashi" as possible.
I know. I was gonna say it.
There's so much "dashi", I mean, I'm a little worried that it's not gonna set.
- But this fluffiness is what makes a "dashimaki" so good.
- Okay. Let's do it.
When cooking "dashimaki tamago," it's easier to use a rectangular frying pan.
- A round pan works fine, too.
- Okay.
But in order to roll the omelet properly,
you need to use a small pan.
- That's a key point.
- Okay!
- Okay?
- Well, please! I will watch you.
Here is our Chef's Technique!
It takes an enormous amount of skill and experience to make a perfect "dashimaki tamago."
So, watch carefully.
Place the pan over medium heat.
And a lot of oil.
- The temperature is very important.
- Right.
Coat the pan evenly with oil.
Preheat the pan thoroughly and test the temperature with a chopstick dipped in the egg liquid.
If it's too low, the eggs will stick. It
has to be hot enough for the eggs to set.
Before adding the egg liquid, coat the pan evenly with more oil.
Test the temperature again. If it
sizzles, you're ready to start cooking.
The oil needs to be hot enough to sizzle, to keep the "dashi" and the eggs from separating.
This is the secret to a making a juicy "dashimaki."
Pop the air bubbles so that
the eggs cook evenly.
Pierce the air bubbles with the tips of your chopsticks.
Looks good.
Once the eggs are half-cooked and no
longer runny, fold the edge towards you.
It's too soft to roll up
with your chopsticks.
So, hold in place and tilt the pan
towards you to flip the eggs.
Tilt the pan towards you and let gravity do its work, flipping the eggs over with the help of your chopsticks.
Push the rolled egg to the back of the pan and add more oil and coat evenly.
- Wipe off the excess oil.
- Okay.
- Okay, nice sound.
- Oh nice.
Test the temperature to make sure it sizzles before adding more egg.
You need to bind the additional egg
to the existing roll.
So, lift the roll up and let the
egg liquid flow underneath.
Pour the egg liquid underneath the roll.
Now, tilt the pan and flip the roll
towards you with your chopsticks.
Let's look at it again from a different angle.
Oil the pan evenly and add more egg, allowing it to flow underneath the roll.
Make sure to pop all the air bubbles with your chopsticks.
Once the egg is no longer runny, use your chopsticks to flip the roll by tilting the pan towards you.
You need to tilt the pan at an angle and let gravity do its work.
Use chopsticks to roll the egg as it drops.
Repeat this process until you've used up all the egg liquid.
Do we have to add the oil each time like that?
- Each time.
- I see.
The temperature is too low.
It doesn't sizzle.
The egg needs to cook quickly
to seal in the "dashi."
After repeating this several times, the roll has become quite large.
But keep on rolling.
This dish makes you work on your timing,
use of chopsticks, and control of heat.
So, it allows you to master
the basics of Japanese cooking.
Wow, that part looks very difficult.
The larger it is, the more difficult
it is to roll.
We're almost done.
Oil the pan evenly and pour in the remaining egg liquid so that it flows underneath the roll.
Pop the air bubbles and flip over.
This is the first thing we teach budding
chefs at culinary school or restaurants.
Finally, press the roll against the pan
to tidy up the corners.
Finally, press the roll against the edges of the pan to shape the corners.
Flip over and shape the opposite corners.
Flip the omelet onto
a bamboo rolling mat.
Align the edges.
Roll it up and let it rest.
This will seal the "dashi" inside
so that you have a juicy omelet.
It's finished.
Okay chef, it's my turn. I think I got it!
Like that, right?
I think it's okay, but at first... practice!
- The towel. Use the towel.
- Use the towel?
Oh! That's why this is here?
This is my egg roll.
Her practice towel is folded to the size of the pan and taped together.
And then... I go like this?
Oh!
It's hard!
Okay, so not too big. I go like this?
No no no no, Yu chan.
- Use your chopsticks to flip it over naturally as you tilt the pan.
- I see. Okay!
Oh... that's easy. Okay!
One...
Two...!
Okay, I'm ready! Woo!
Now for the apprentice.
First, coat the pan with oil.
Okay, here we go!
Good sound. Perfect.
And make sure we spread it very thinly...
And the bubble.
It's bubble... right?
Fold the edge towards you.
- Like this?
- Yes, yes.
And then, here we go!
I have to do this many times.
Repeat the process, adding more oil.
Oh, this is very busy! I have to put the oil...
Oh my goodness! And I have to... okay here we go.
I hope the temperature is right.
The temperature is good.
You're doing great.
Now, lift up the roll and let the egg liquid flow underneath.
- Okay.
- And the bubble...
- Smash that...
- Not yet, not yet!
Oh, until all the liquid gone.
That's right.
Wait until the egg is no longer runny before flipping it over.
Okay, I think it's good.
Grab by the middle...
And... wow!
Next, slowly.
- Okay!
- Oh... I see.
Nice. Oh, and go! Open that up!
- Right?
- You're right.
Now, it's getting more difficult because the egg is heavier.
Okay.
We're in the final stretch.
Now we have to be careful because this is the last.
I put it all in.
The temperature is good, okay.
Okay, this is really hard because it's heavier. I can feel it.
You can fix the shape with
the bamboo mat.
One, two... ah!
Nice! Okay.
Okay, but it's all burnt, chef!
No problem.
Yay!
And then...
Flip the roll onto the bamboo mat and use both hands to wrap and shape.
Perfect.
It was fun!
Good job!
Thank you chef. You are the master teacher.
Next, let's plate the "dashimaki" tamago.
- First, take off the rolling mat.
- Okay.
Oh...! Chef, beautiful.
Thank you.
Now cut into three equal pieces, so that it's easier to eat.
Look at the cross section.
The "dashi" is oozing out.
Beautiful.
The "dashi" should ooze out when cut.
Okay chef, let's see how my rolled omlet turned out.
I'm so nervous.
Oh! It's so burnt... but I think it'll be good Cut into three equal pieces.
- Very important. Is inside juicy?
- Yeah!
You can see that it's full of "dashi."
Now, let's plate the "dashimaki."
Wow... that looks so yummy.
So yummy with a lot of grated "daikon."
Yes! I love grated "daikon".
"Dashimaki tamago," is typically served with grated "daikon" radish.
So, grate the "daikon" in advance.
Just a little bit soy sauce.
Oh... that's a good idea.
A dash of soy sauce creates a nice contrast of colors and it's very tasty.
Oh that looks so good.
And we are finished!
And now for another very popular dish: "kayaku" mixed rice.
It's full of delicious ingredients.
So next, we are going to make "kayaku" mixed rice.
Yes.
We have chicken, green beans, mushroom, carrot, "konnyaku", and deep fried tofu.
Use seasonal root vegetables to create
a medley of color and textures.
Yes! And you know, this some "abura-age", deep fried tofu, soaks up all the seasonings, so it's really yummy.
- It brings a depth of the flavor.
- Yes.
Here is our Chef's Tip!
Dice the ingredients into small, uniform pieces.
The use of different textures
adds depth to the dish.
But you have to make them
the same size.
Cutting them into small, uniform sizes is essential for creating a harmony of flavors.
First, cut the chicken.
Cut the chicken into 2 centimeter cubes.
Blanch the chicken to remove
the distinctive smell.
Add the chicken to boiling water to blanch, then shock in ice water, and drain.
Remove the "shiitake" stems and cut the caps into 1 centimeter pieces.
Likewise, cut the carrot into 1 centimeter cubes.
Cut the "abura-age" the same way.
Cut the "konnyaku" into slightly larger 1.5 centimeter pieces, to emphasize the texture.
Cut the green beans into 1 centimeter lengths and boil in water with a pinch of salt.
Place in an ice bath to shock, and pat dry with paper towels.
So chef, we have all our ingredients cut up into small nice sized pieces and we are ready.
Okay, let's cook!
Rinse the rice and place in the rice cooker.
Add the "dashi," "mirin," and soy sauce.
Mix well.
Place the ingredients on top of the rice.
Never mix.
If you do, the rice will cook unevenly.
I see.
So just place on top.
And, turn on the rice cooker.
30 minutes later...
Ta-da!
Oh... smells so nice.
And then mix.
Wow that's nice. Oh! Okoge!
I love that! I love that burnt part, it's so nice.
Use a cut-and-fold motion to
mix well, and release the aroma.
Now, for the plating.
Careful not to press down.
- Boiled green beans.
- Oh Okay.
Oh so we add that. That's nice.
Plate the rice so that it's possible to
see what's inside from every angle.
Okay.
And... it's finished!
Both dishes are ready to serve.
Two quintessential Japanese dishes.
They look fantastic.
Chef, today, you taught us how to make two of the most popular, home cooked Japanese dishes.
Oh, the omelet.
I learned so much today.
- But today was extremely difficult because of the wetness of it.
- Yeah.
A lot of the "dashi."
- Please try the "dashimaki tamago" omelet.
- I will.
Yay! And I love "dashimaki tamago" with lots of grated "daikon."
Well, I know mine burnt a bit, but...
It takes practice.
But you did very well.
It looks delicious.
Oh, really? Oh you are so nice.
Here we go!
Wow... it's so flavorful.
- It's soaked up so much "dashi".
- Right.
Oh and so much umami that after you swallow the "tamago" the omelet, there is a long lingering in your mouth of the umami.
A "dashimaki" tastes best
when it's saturated with "dashi."
The omelet is just so...
- Like soup.
- It's kind of like soup.
- Very interesting.
- Yes, so interesting.
Yes, that's Japanese food for you.
Okay so, next I'm try the "kayaku" mixed rice.
Wow, look how pretty it is.
Oh that's so good.
- Good?
- Mm-hmm.
- Many flavor.
- Exactly.
Chef, wonderful. I learned so much from you today.
Thank you so much.
You're welcome.
You really taught me important techniques today.
This omelet is the basic of basics.
It's packed with lessons on controlling
heat, using chopsticks, and timing.
If you practice making a "dashimaki,"
you can master Japanese cuisine.
Please enjoy trying it yourself, at home.
Well, thank you so much, chef, for teaching me.
Yeah. Thank you for joining me.
Okay, Let's review today's recipes.
First, the "dashimaki tamago."
Combine the beaten egg with "dashi," seasoned with "mirin," "usukuchi" soy sauce and salt.
Pour some of the egg liquid into a well-oiled pan to form a roll.
Repeat 4 to 6 times to thicken the roll.
Wrap in the bamboo mat and slice.
Serve with grated "daikon" radish.
Next, the "kayaku" mixed rice.
Cut the chicken into cubes.
Blanch the chicken.
Dice the remaining ingredients into 1 centimeter pieces.
Rinse the rice and stir in the seasonings.
Place the ingredients on top and turn on the rice cooker.
Once cooked, garnish with green beans to serve, and that's it.
Why not try your hand at these quintessential Japanese dishes at your house?